Importing Customers
Bring a whole customer list into MTMPRO from a spreadsheet instead of typing each person in. This page covers getting the file ready, matching its columns, how duplicates are left out and how to check what came in.
When you would use it
Importing is for a list. For one customer, or a few, adding them by hand is quicker.
- You are moving to MTMPRO Your client book lives in another program or a spreadsheet. MTMPRO does not pull customers straight out of other programs, so export the list as an Excel or CSV file and import that once. Your first order then goes to a customer who is already there.
- A trunk show brings in new names The weekend's sign-up sheet becomes a file. Import it with the duplicate boxes ticked and the regulars who signed up again are left out. Remove anyone who is on the sheet twice before you upload, because the file is not checked against itself.
- A few walk-insAdd Multiple on the Customers page takes a name, email and phone for several people at once, and Add Customer takes everything for one. See Adding and Editing Customers.
Where to find it
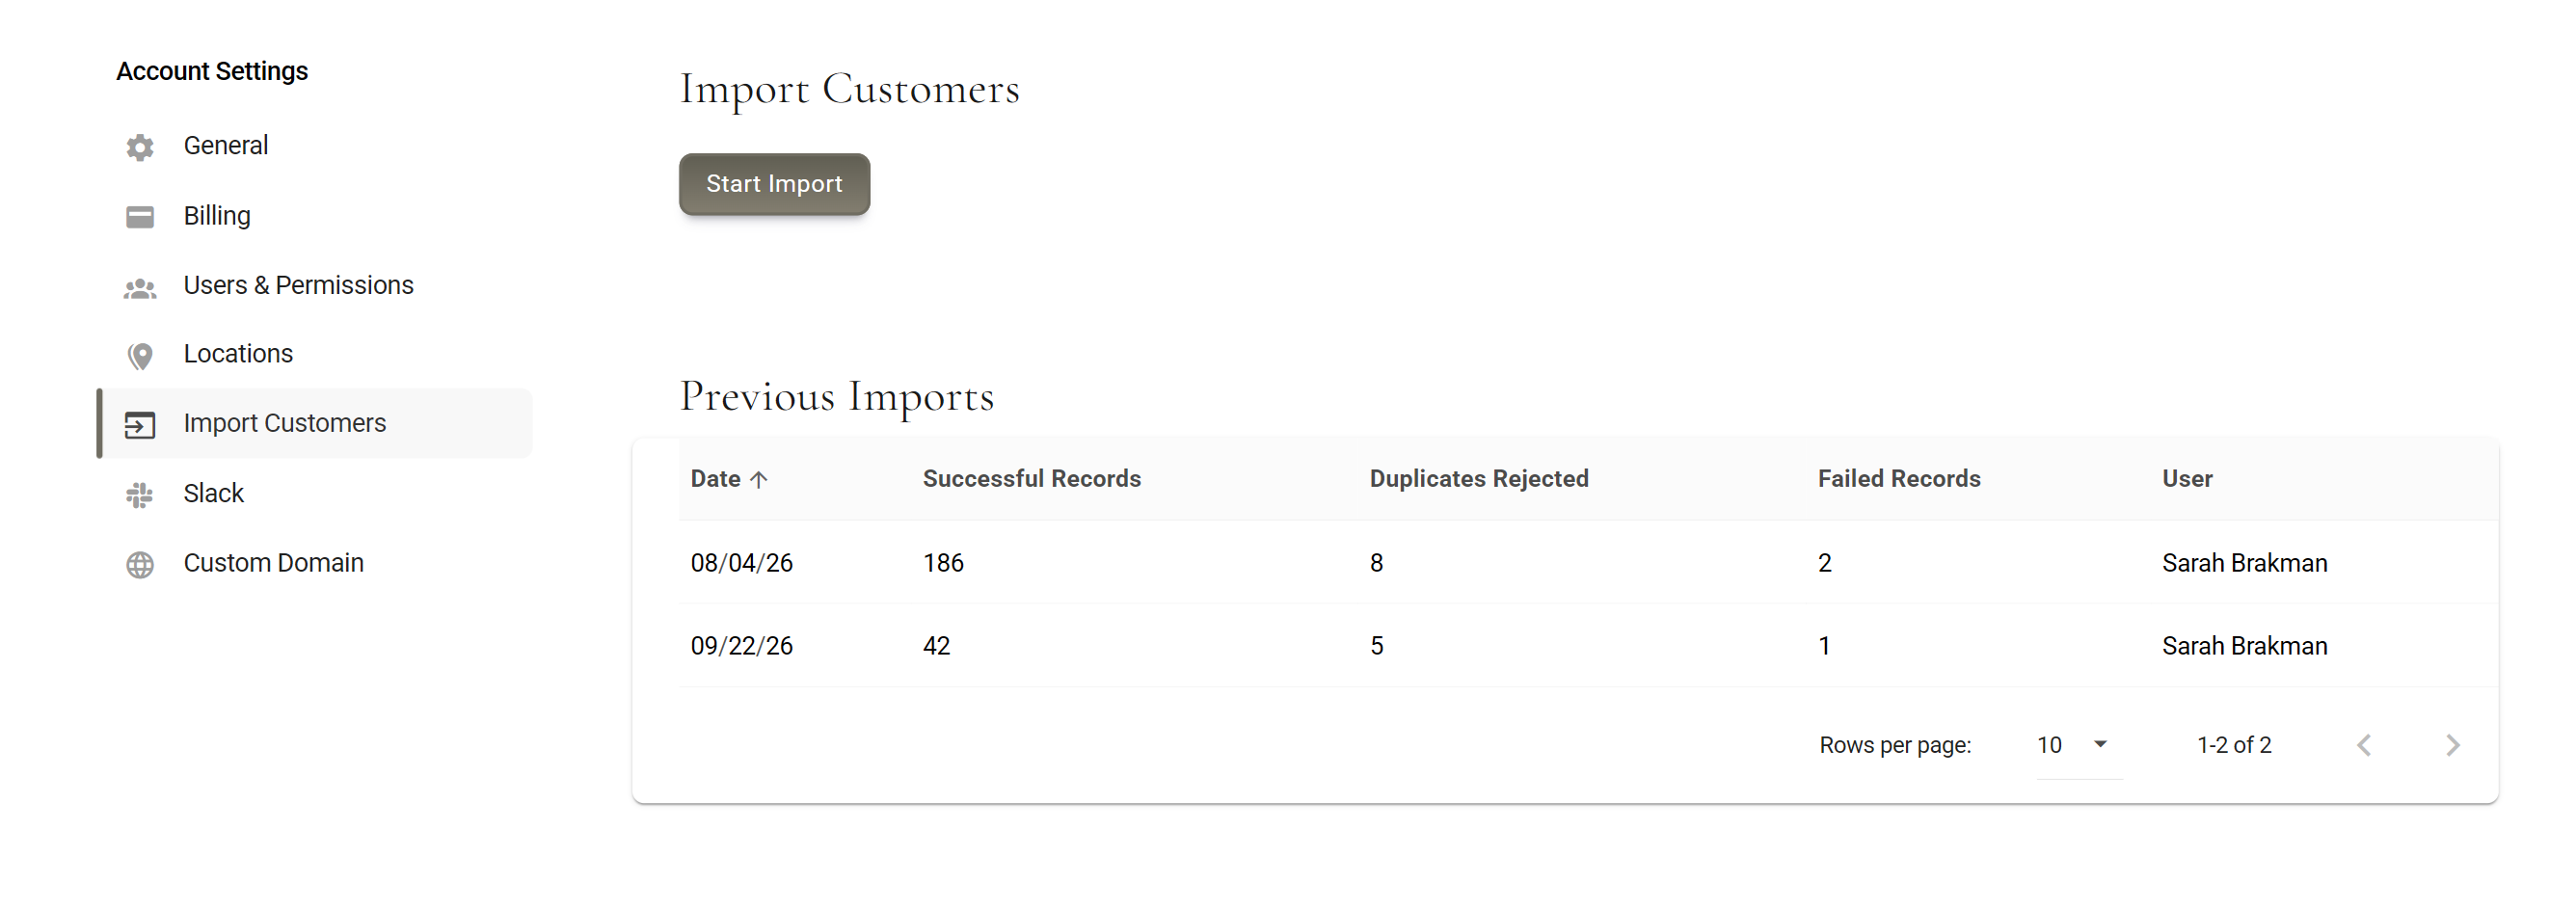
Click Account in the left menu, then Import Customers. Only the store owner has the Account menu, so only the owner can run an import. It is included on every plan.
Getting the file ready
Open the list in Excel, Numbers or Google Sheets and tidy it before you start. A few minutes here saves fixing customers one at a time afterwards.
- One customer per row On the first sheet. Other sheets in the file are not read, and blank rows are skipped.
- Column names in the first row Not required, but they make the columns easy to tell apart. You leave that row out in the second step.
- Only the columns you want Every column with something in it has to be matched to a customer field before you can go on, and each field can be used once. So delete the columns you do not want, such as birthdays or last visit, before you upload. That makes fifteen columns at most. Empty columns are left out for you.
- A first and last name on every row Either a First Name and a Last Name column, or one Full Name column. A row with an empty first or last name is not imported and counts as Failed.
- Save it as .xlsx if you can A .csv file loses the leading zero of ZIP codes such as 02116, and can scramble accented names such as José or Müller. An .xlsx file keeps the accents, and keeps the zeros once the ZIP column is formatted as Text. If it has to be .csv, save it from Excel as CSV UTF-8 so the accents survive.
What you can bring in
Each column goes into one of these fields, grouped as the list in the app groups them:
- NamesFull Name, First Name, Last Name
- ContactEmail Address, Primary Phone, Secondary Phone
- WorkCompany, Title
- AddressStreet Address, Street Address 2, City, State / Province, ZIP / Postal Code
- OtherNotes, Pronouns
How some columns are read
- Full Name The last word becomes the last name and everything before it the first name, so Mary Ann Fischer comes in as Mary Ann and Fischer. Put the first name first: Fischer, Mary Ann would come in as Fischer, Mary and Ann. A single word becomes the first name, and the customer is saved with no last name.
- Phones One type for the whole column: Mobile, Work, Home or Other. You pick it when you match the column.
- Notes Go into the customer's General Notes.
- Pronouns Write he, she or they, in lower case, to match the He/Him, She/Her and They/Them choices in the customer dialog. Anything else is kept as written and shows under Other.
- Emails and phone numbers Come in as written, without any checks. The Add Customer dialog makes sure an email looks like an email, but the import does not, so fix typos in the file first. From a .csv file, a phone number that starts with 0 loses the 0, as ZIP codes do.
Starting from the template
Download Import Template, in the first step of the import, gives you an Excel file with the column names already in the first row and five sample customers below them. Delete the samples before you fill it in, or they come in too. The template has no email column, so add one if you have emails.
Importing, step by step
Nothing is saved until you click Import in the third step. Until then, Go Back and Cancel change nothing.
- Start the import On Import Customers, opens in MTMPRO, click Start Import.
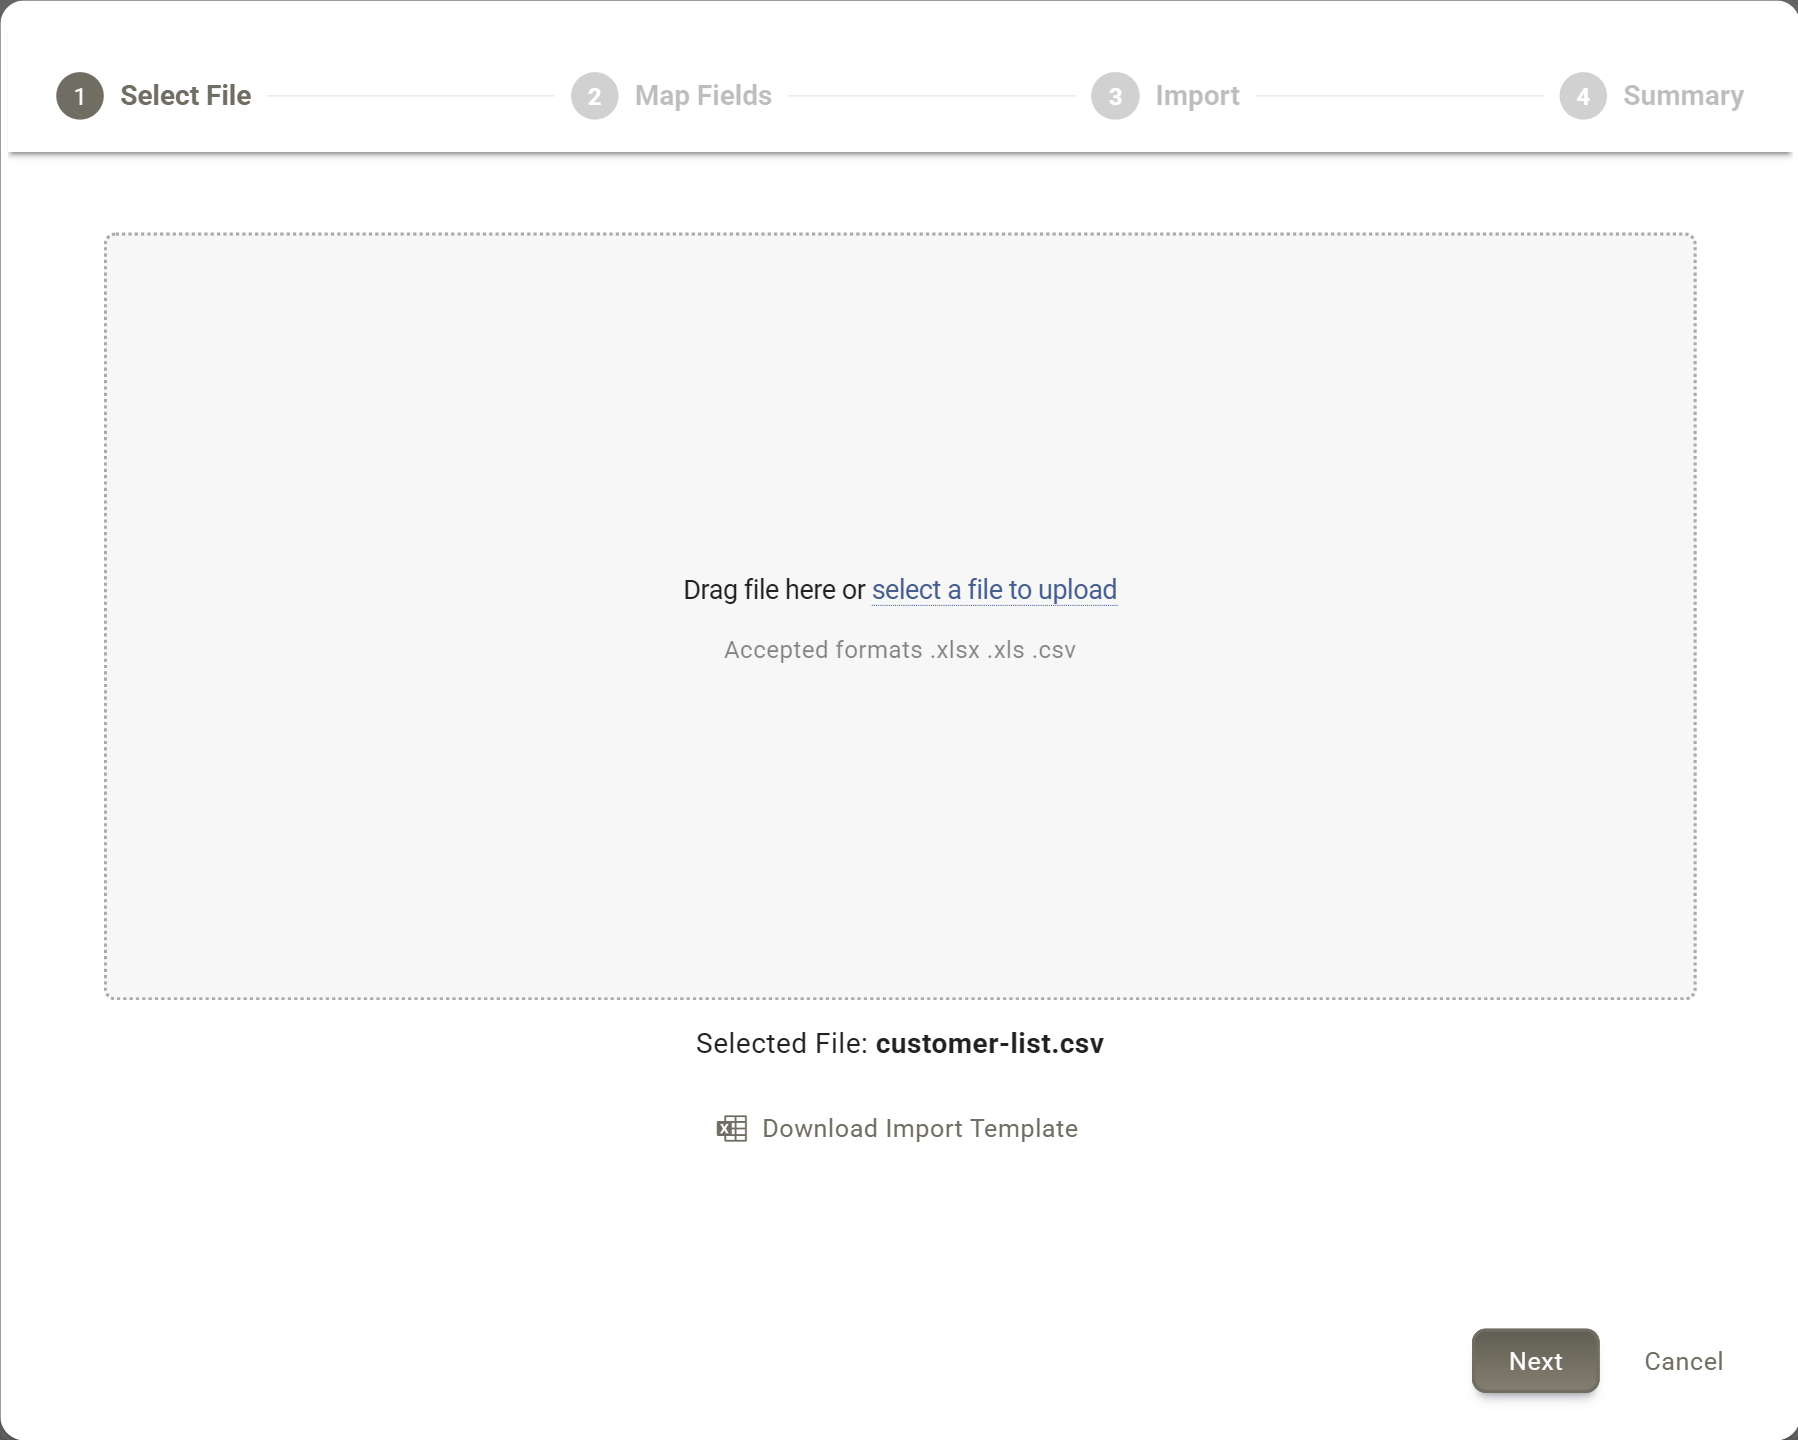
- Pick the file Drag it onto the dotted box, or click select a file to upload. Its name appears under the box. Click Next.
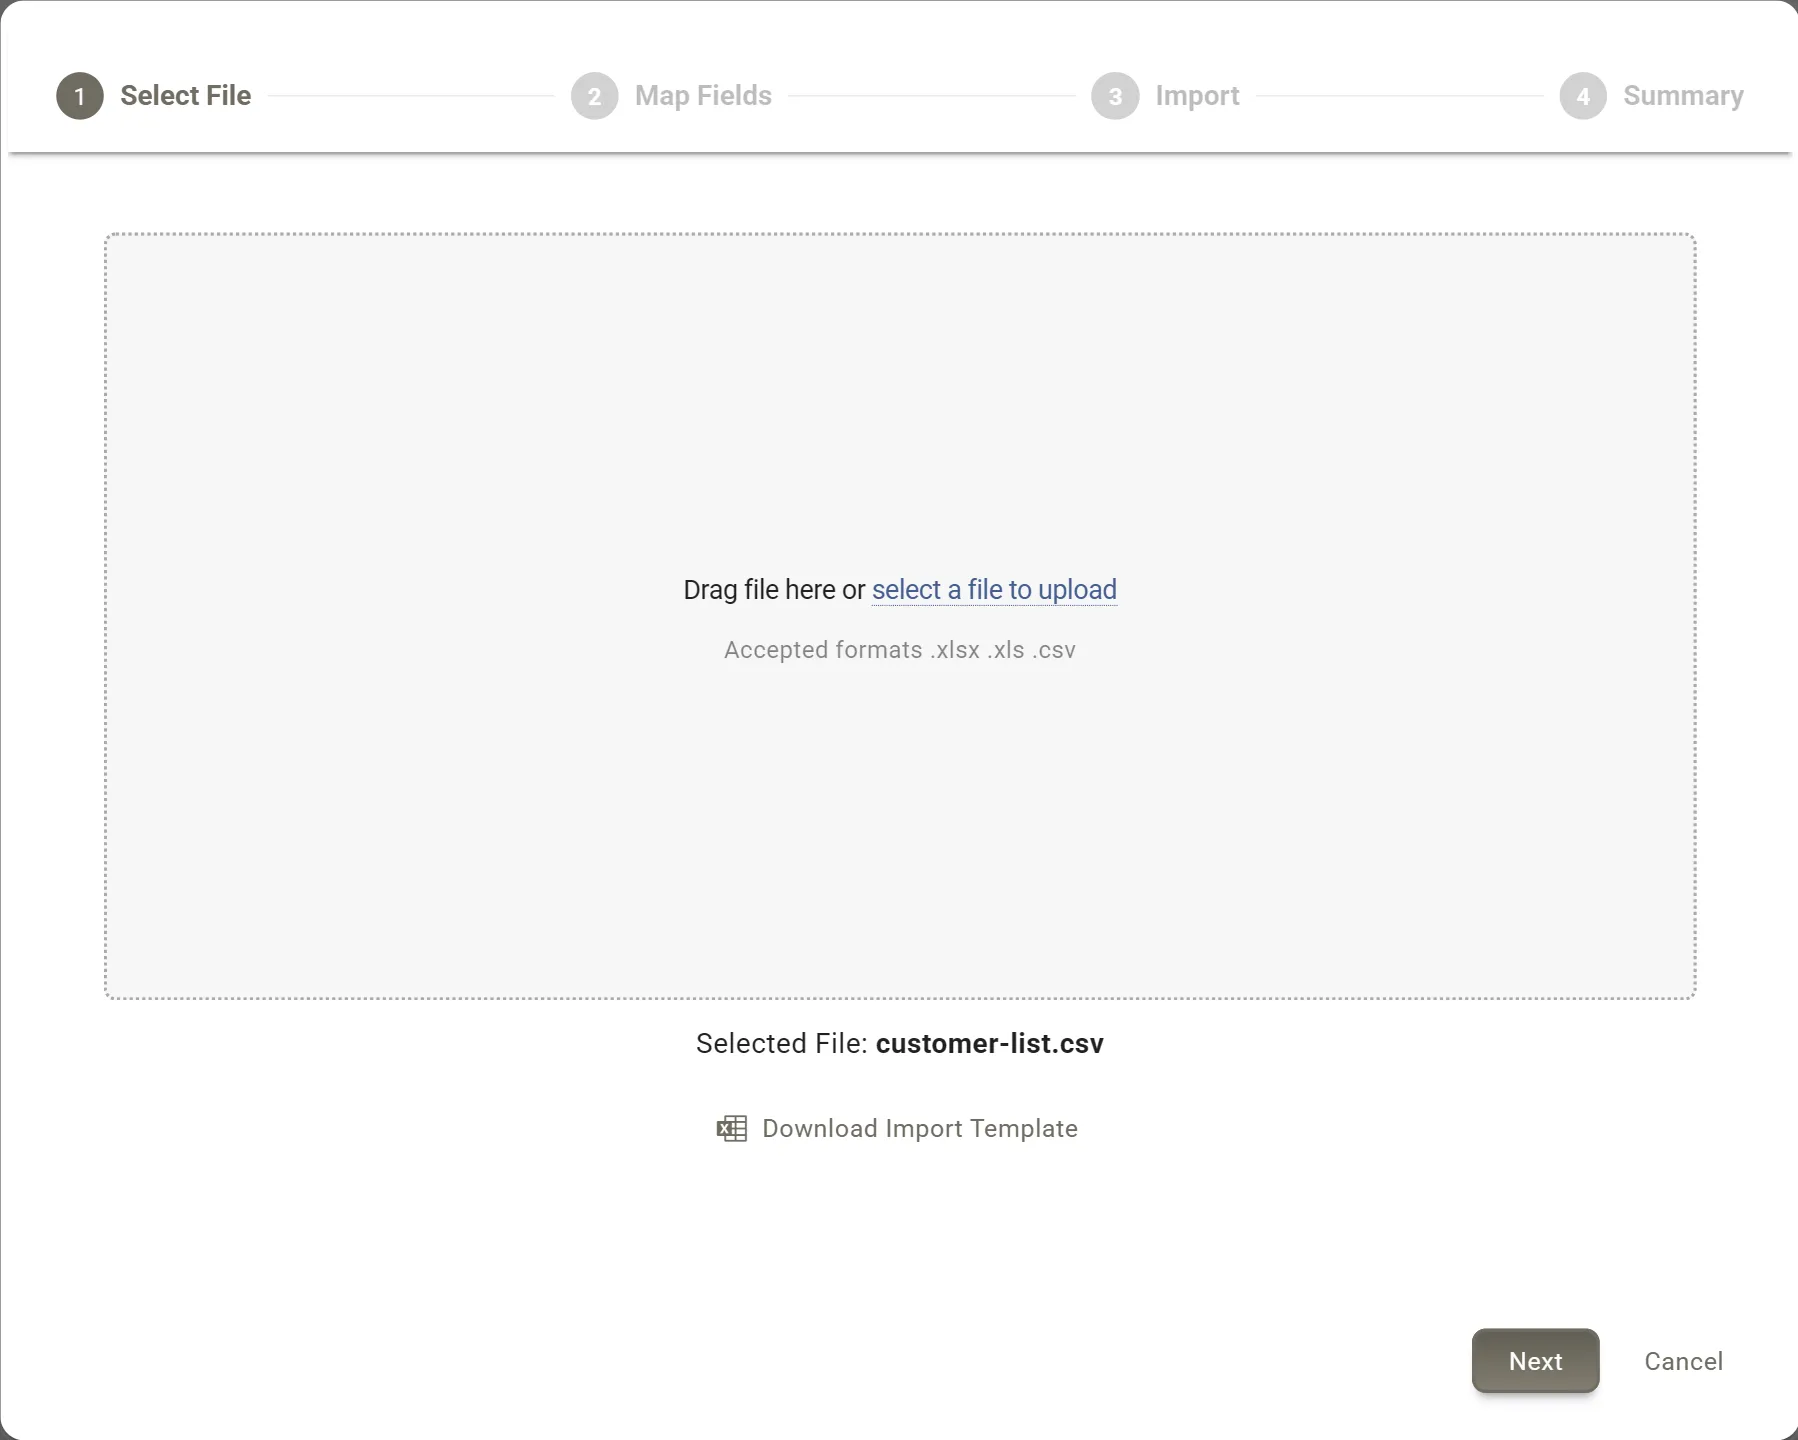
The file's name shows under the box once it is picked. - Leave out the header row If the first row holds column names, tick Remove header row from data before anything else. Ticking it later can clear the columns you have already matched.
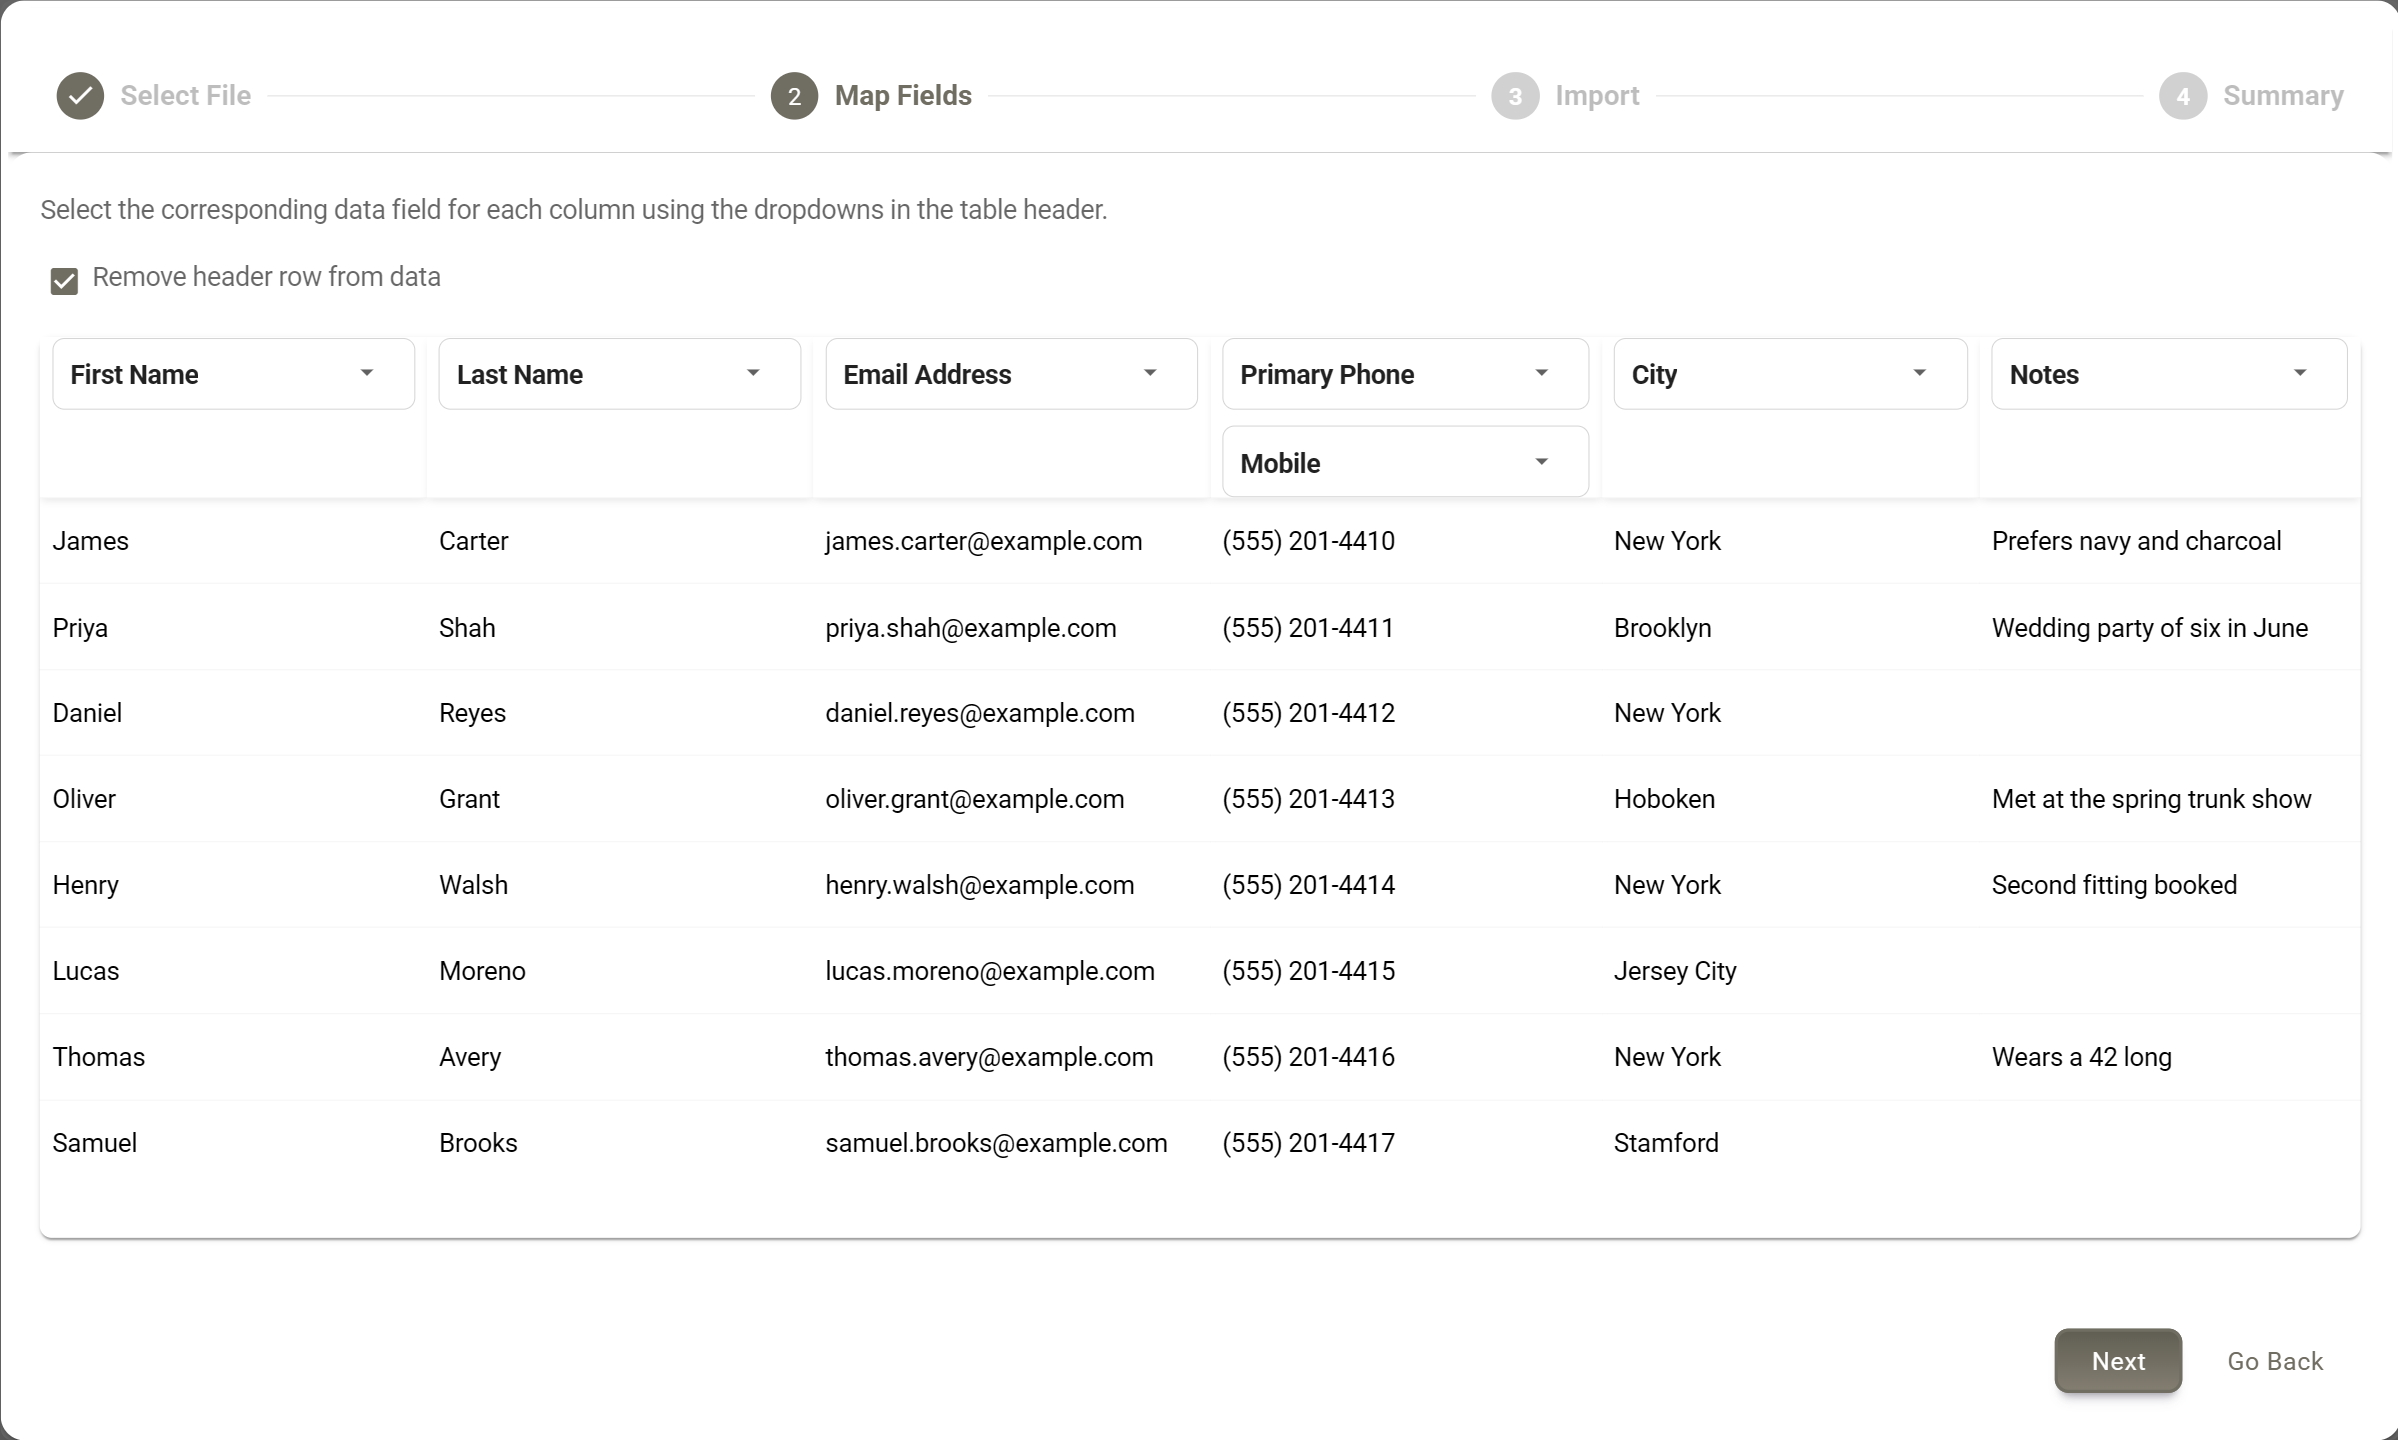
- Match each column Above each column is a dropdown, Map Col 1, Map Col 2 and so on. Pick the field that column holds. A field already used elsewhere is greyed out. For a phone column, also pick its type under Phone Type (Optional). Next turns on once every column has a field.
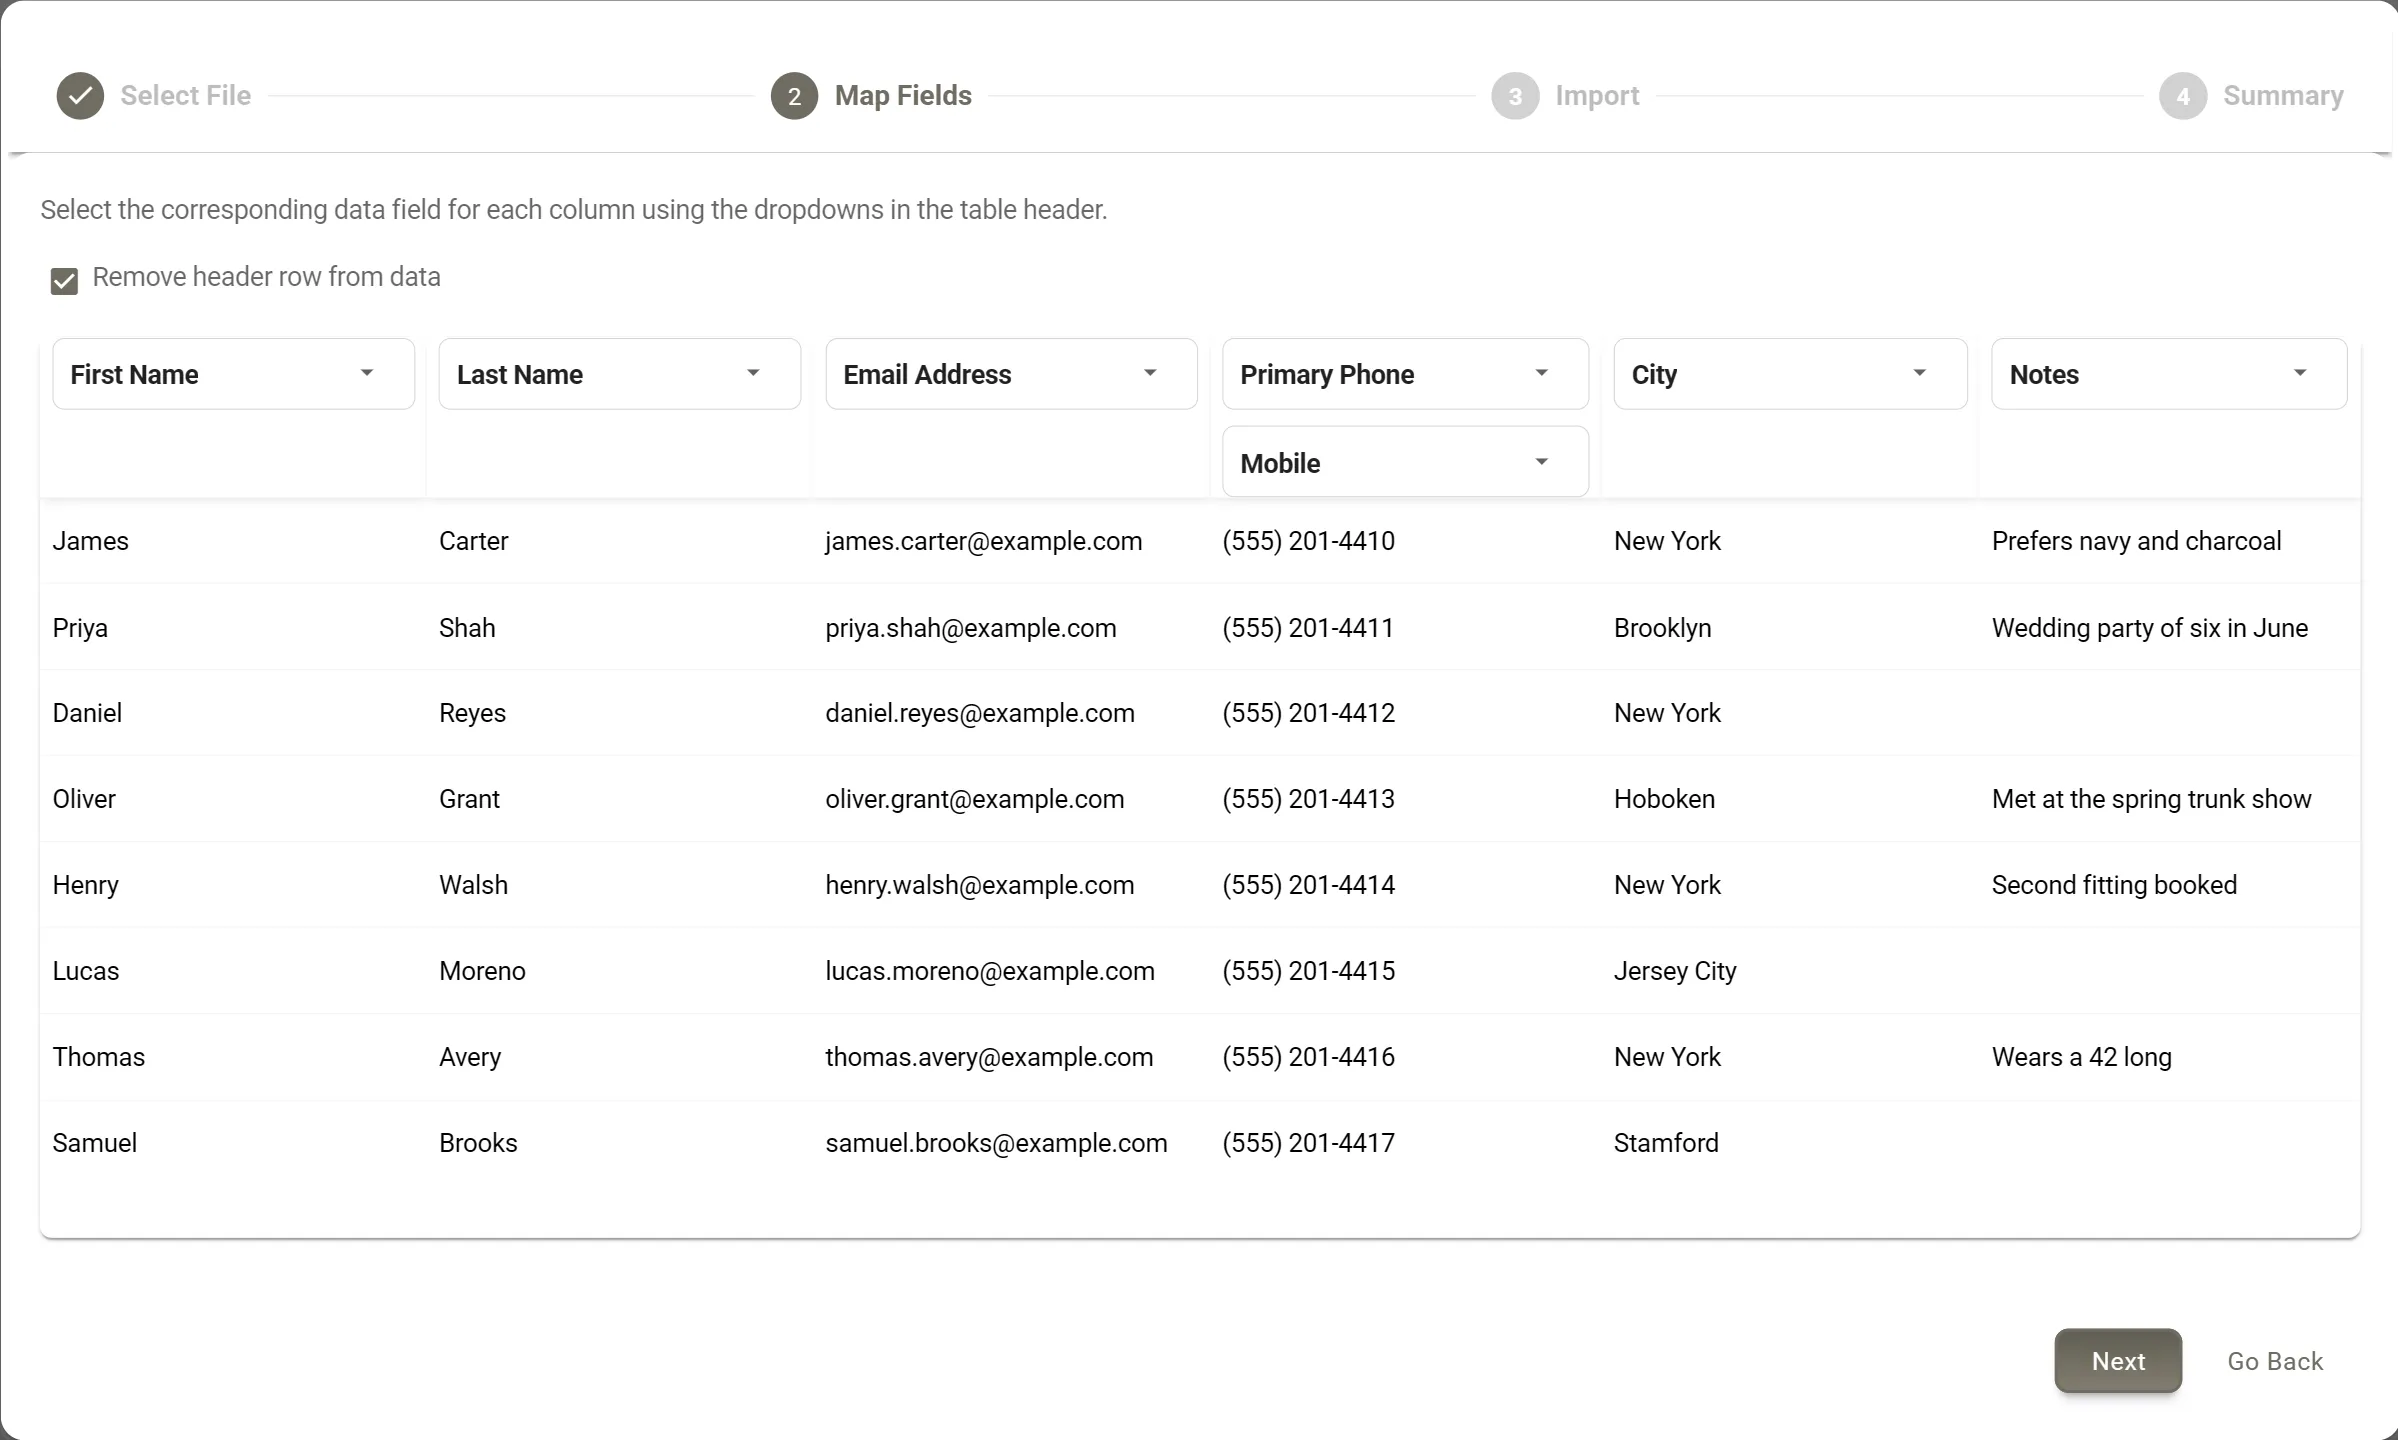
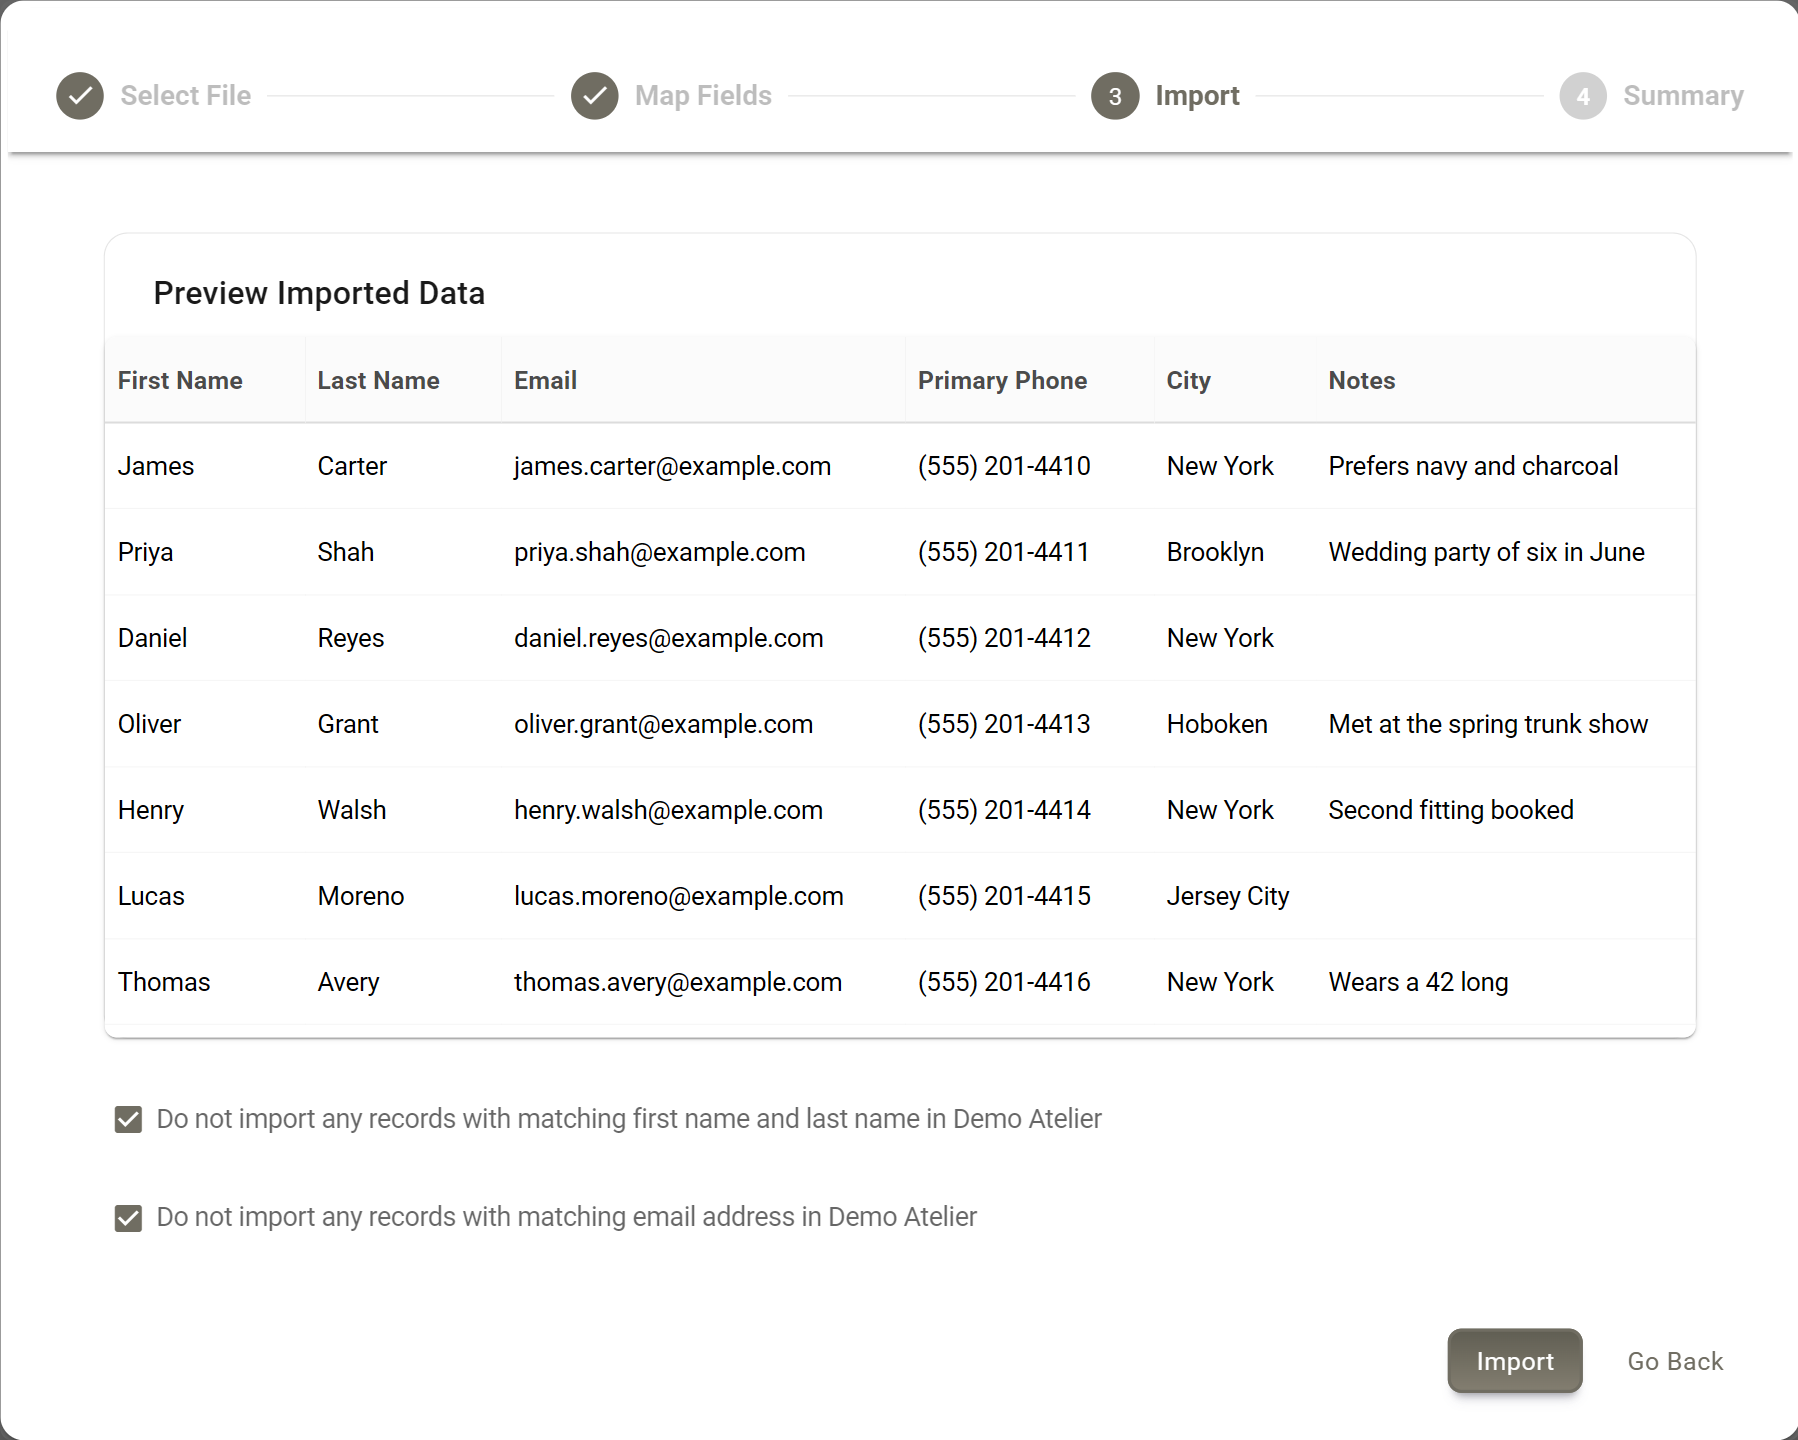
The file's Mobile column goes into Primary Phone, with Mobile as its type. - Check and import The third step shows every row as it will come in, with each column under its field. Scroll the table to see them all. Decide what happens to customers you may already have (see duplicates below), then click Import.
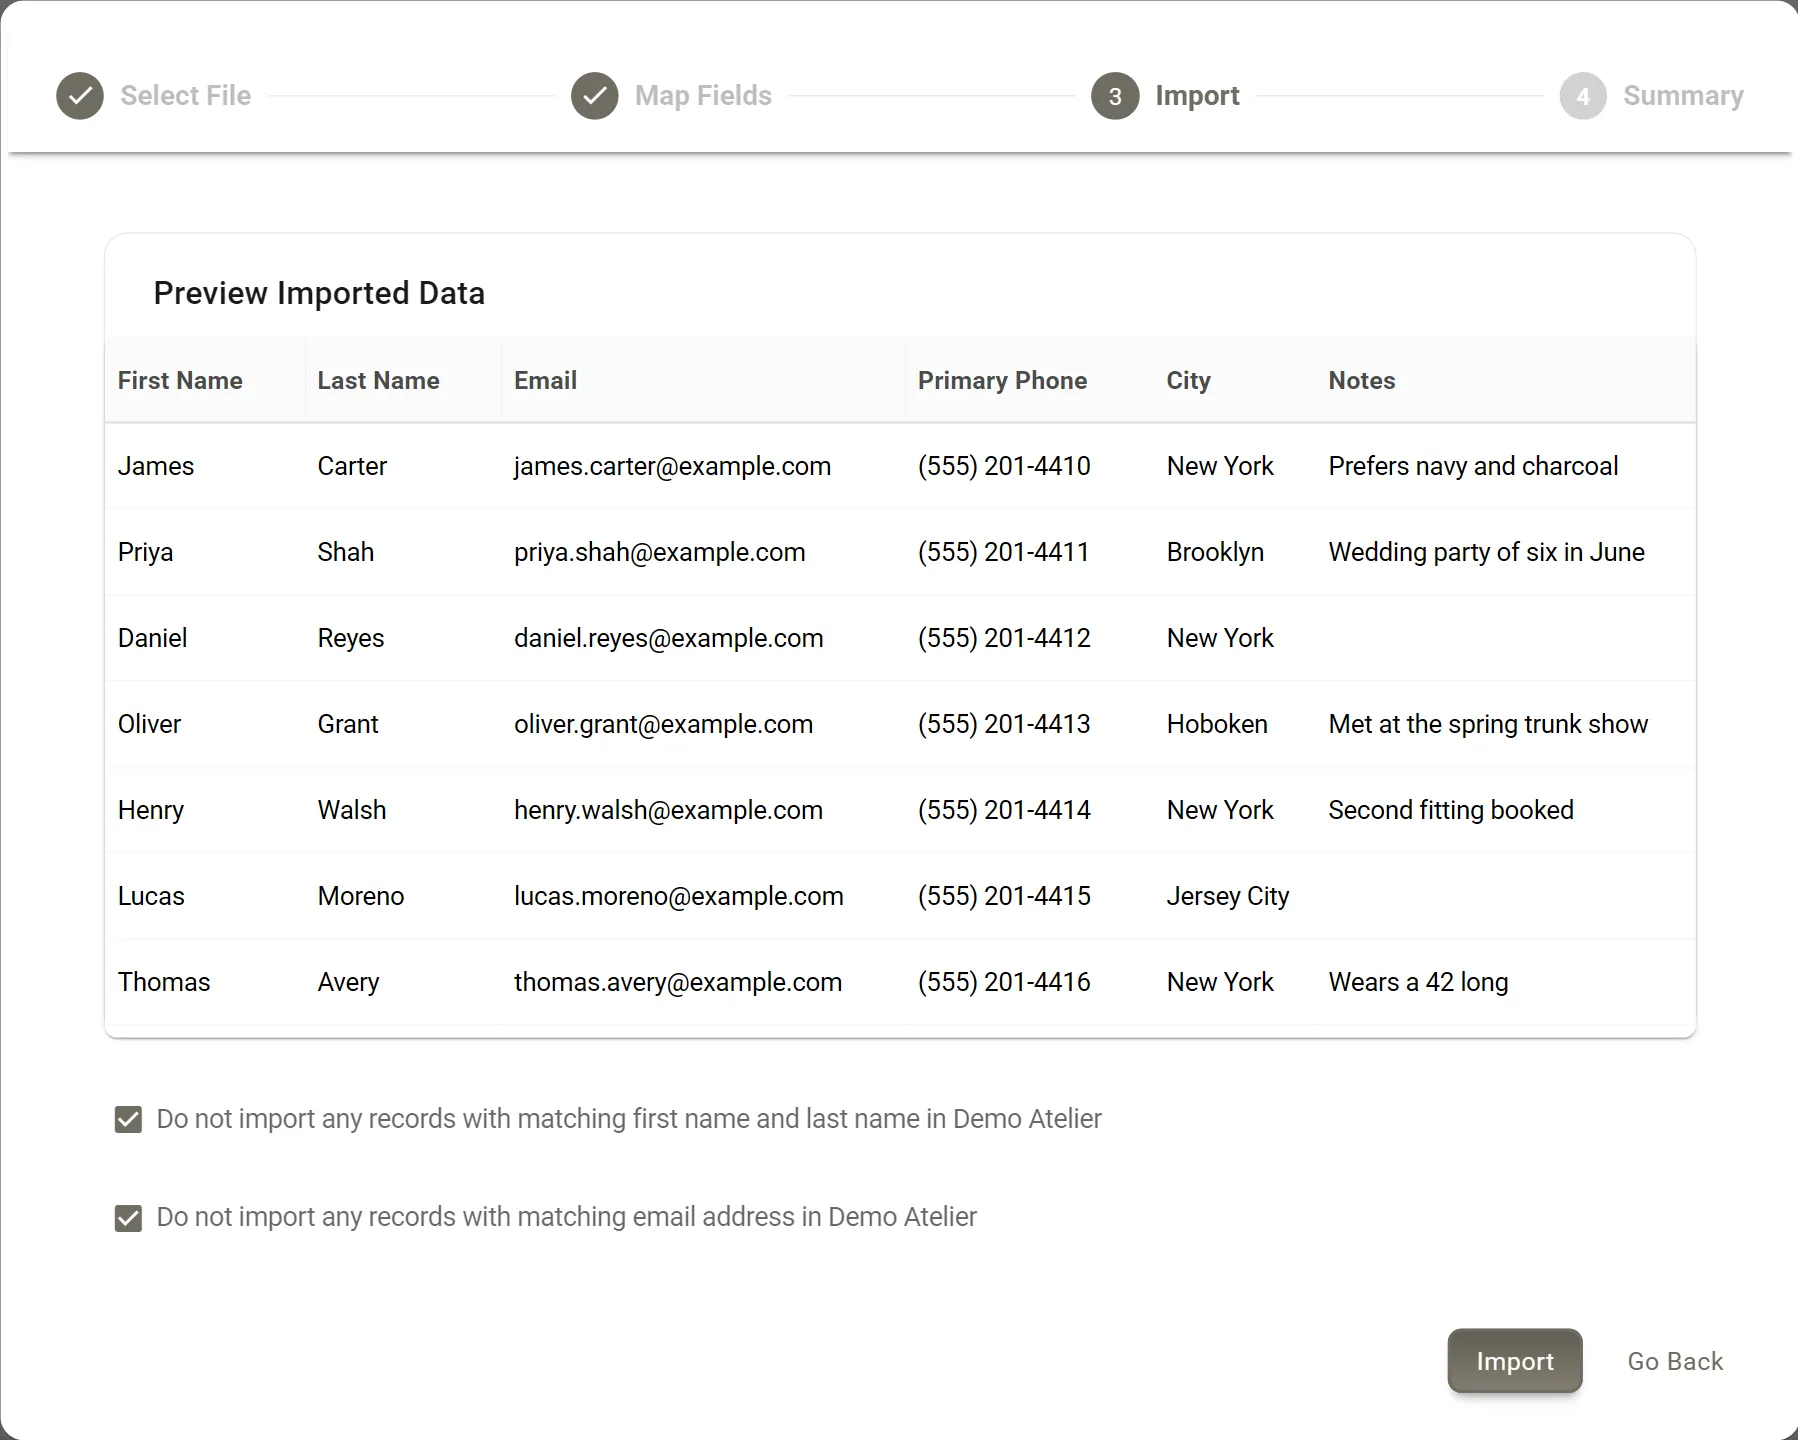
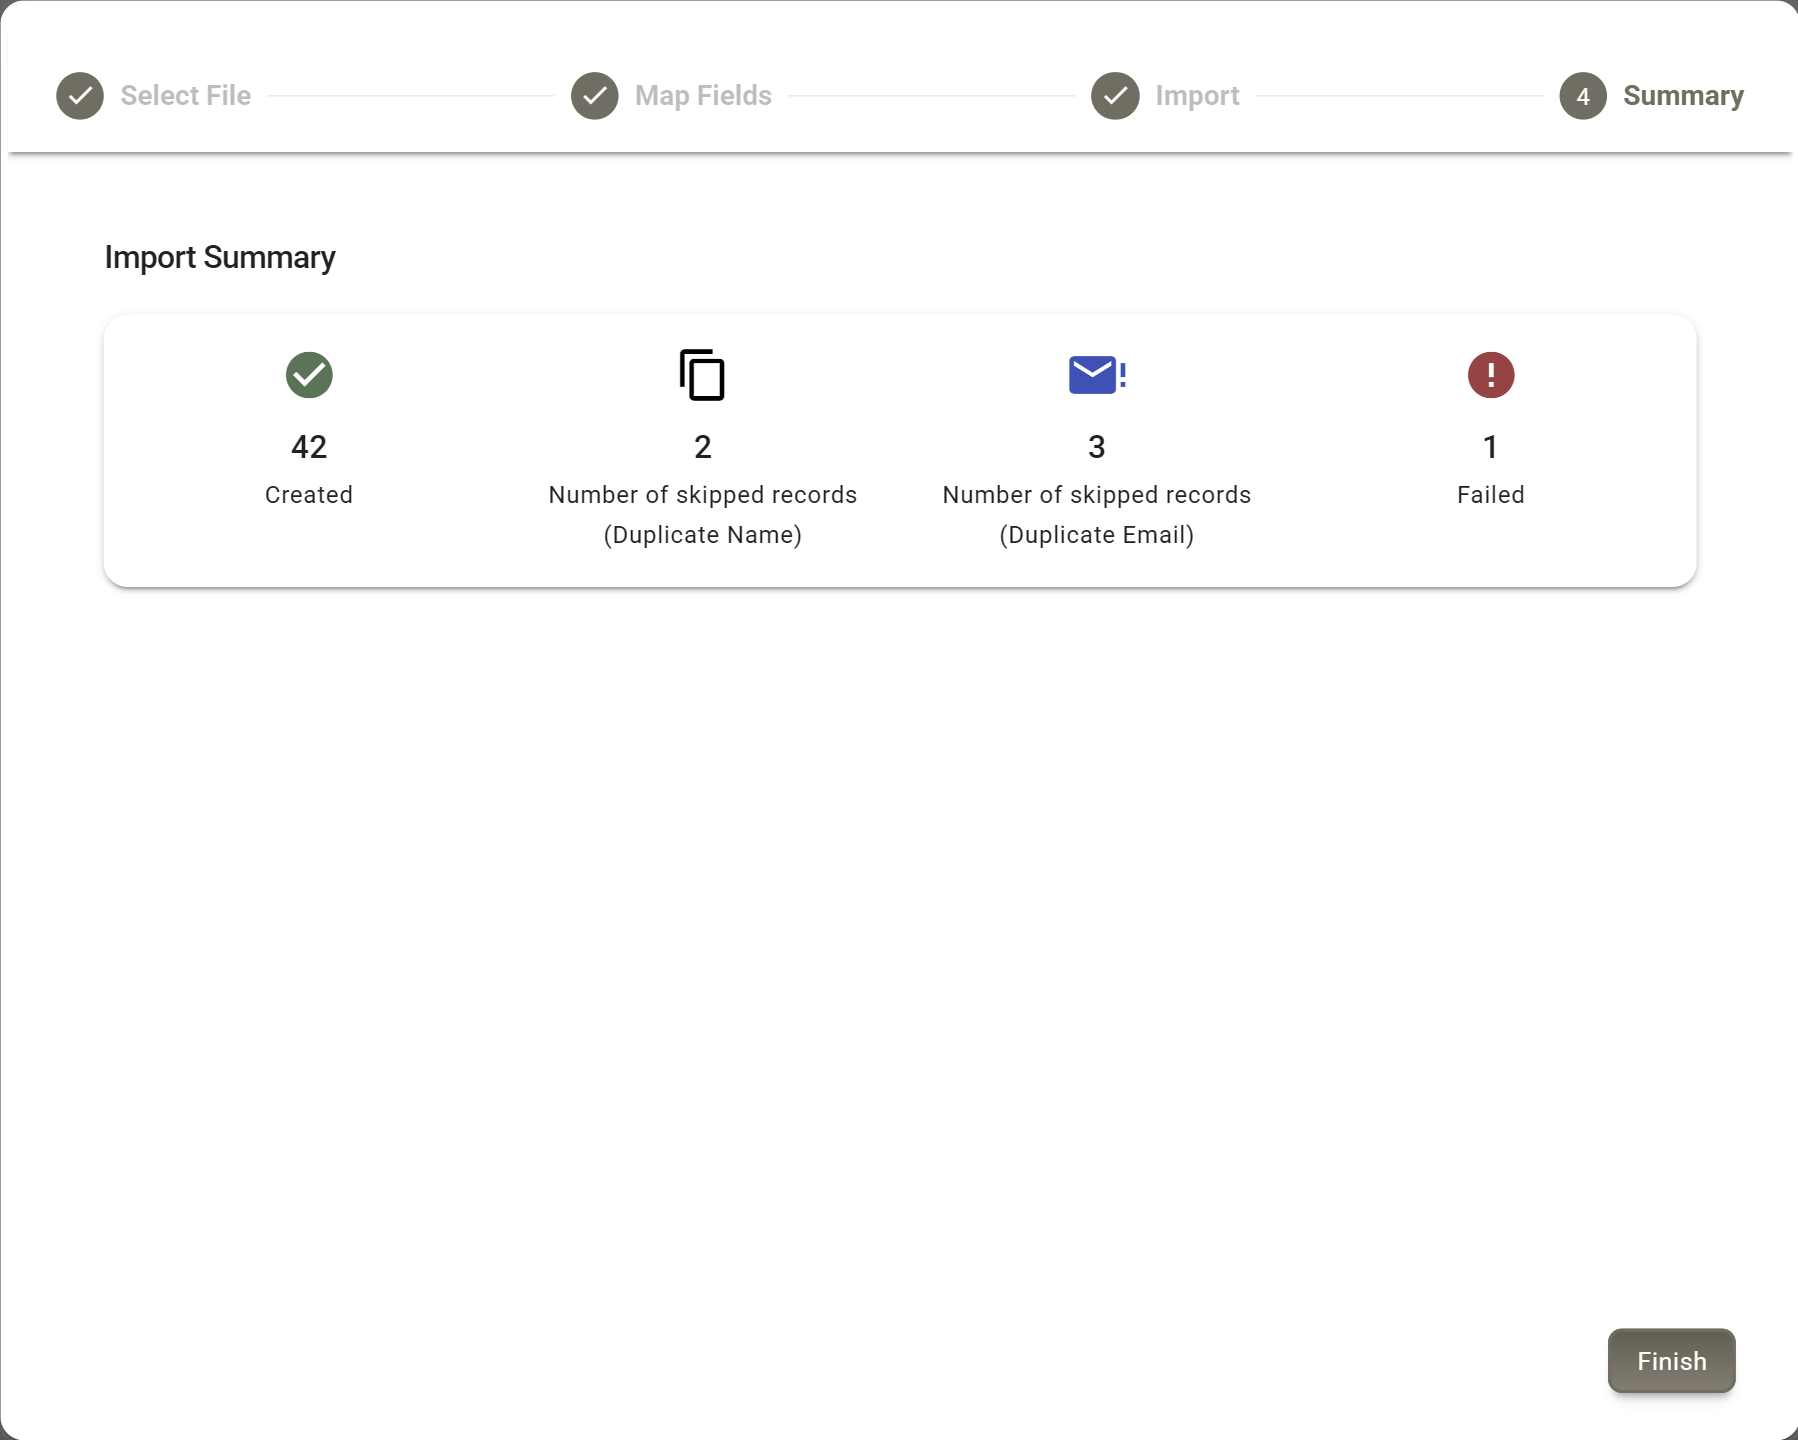
The last look before anything is saved. Both duplicate boxes start ticked. - Read the summaryImporting Customers... shows while each row is saved, then the summary. Wait for it before you leave the page, then click Finish.
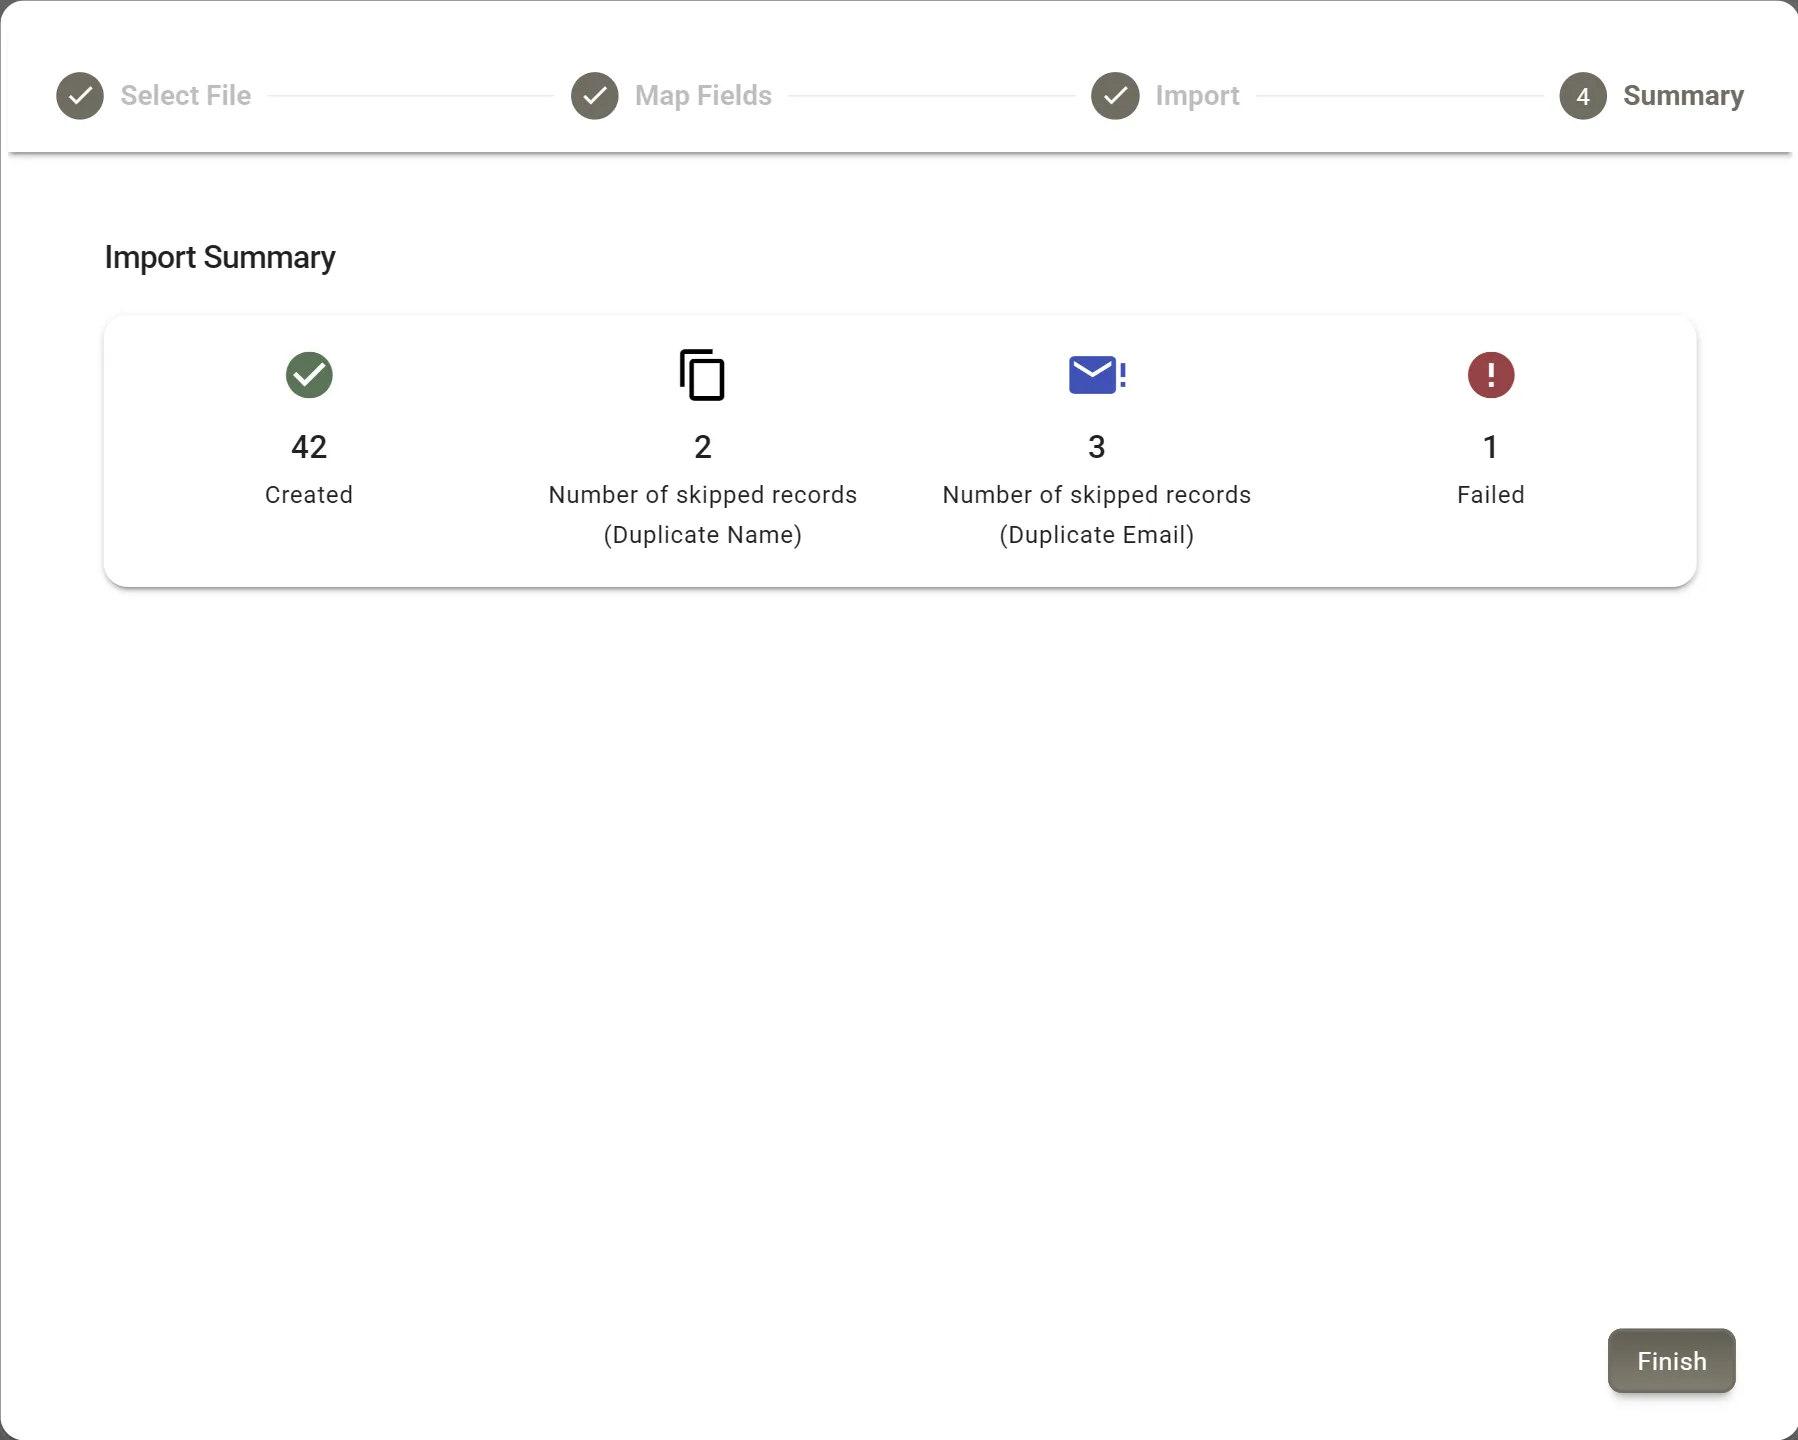
42 new customers, 5 left out as duplicates and 1 that could not be saved.
Duplicates
Import a list twice, or a list full of people you already have, and you would get two of the same customer. The two boxes in the third step stop that. Both start ticked.
- Do not import any records with matching first name and last name in your store's name. Leaves out a row whose first and last name match an existing customer. Capitals and spaces at either end do not matter.
- Do not import any records with matching email address in your store's name. Leaves out a row whose email matches an existing customer's. The email has to be written exactly the same, capitals included.
For now both checks also look at customers in other MTMPRO stores, not only yours, so a new customer who shares a name or email with someone elsewhere is left out too. If someone you expected is missing from the Customers page, add them by hand, or import them again with that box unticked.
A row that matches on both counts once, as a duplicate email. Untick a box to bring those rows in anyway, for example when your file has a second James Carter who really is a different person.
- Import only adds A matching row is left out. The customer you already have is not changed or filled in from the file, so a newer phone number in the file does not reach them. Update them by hand.
- The file is not checked against itself The boxes compare each row with customers already saved. A person listed twice in the same file comes in twice, so remove repeats before you upload.
Checking what came in
- CreatedNew customers added.
- Number of skipped records (Duplicate Name)Rows left out because the name matched.
- Number of skipped records (Duplicate Email)Rows left out because the email matched.
- FailedRows that could not be saved, such as a row with an empty first or last name.
The summary gives numbers, not names. To see which rows were left out, search the Customers page for the people you expected.
After Finish, the import is listed under Previous Imports, oldest first, with the date, Successful Records, Duplicates Rejected (name and email together), Failed Records and the User who ran it. Until the first import, the page reads No customers imported yet.
If your account posts to Slack, each import also sends one message with how many came in, who ran it, and how many were skipped or failed. It is the Customers imported switch in the Slack settings. See Slack Integration.
Good to know
- There is no undo An import cannot be reversed in one go. A customer brought in by mistake is deleted one at a time, from their Edit Customer dialog. See deleting a customer.
- The customers are assigned to you Everyone imported is assigned to the person who ran the import, and to their location if they have one. They are not put in any group. An associate set to Restricted access to assigned customers and new customers added by this user does not see them until you assign them.
- Your New Customers settings do not apply Fields your shop makes required in Settings, New Customers are not checked on import. A customer imported without an email will need one the first time someone edits them, if Email is required.
- Street lines are not kept yetStreet Address and Street Address 2 are in the list, but for now only the city, state and ZIP of an address are saved. Add street lines by hand, or leave those columns out of the file.
- If the import stops A red Failed to import customers. message means it could not finish. Some rows may already have come in, so look on the Customers page before you try again, and keep both duplicate boxes ticked so they are not added twice.