Garment Statuses
Every garment carries a status that tells your team where it is, from the first draft to the day the customer takes it home. This page covers changing statuses, reading a garment's history, setting up your own list, timers that flag a garment running late, and when a garment gets locked.
What statuses do
A status is the coloured chip on every garment. It answers the question you hear most in a shop: where is it now? Your team moves the chip along as the garment goes to the manufacturer, comes back, gets altered and goes home with the customer.
Some steps move on their own. A new garment starts in Draft. Mark for Review puts it in Ready for Review, and Check and Submit puts it in Submitted. When a manufacturer that works in MTMPRO ships it, it moves to Shipped from Mfr. MTMPRO calls the statuses with behaviour like this built in System Statuses. They are marked in your list and cannot be renamed or deleted.
Every change is kept in the garment's history with who made it and when, and a timer on a status can flag a garment that has sat there too long.
When you would use them
- A box arrives from the manufacturer Tick the garments on the Garments page and move them all to your received status in one go, with a note such as the tracking number.
- A customer calls about their suit Open the garment's status history: every step with its date, how long each one took, and the note a colleague left when it went on hold.
- Finished garments wait too long for pickup Put a timer on the status. Anything still there after that many days turns red on the Garments page, so someone calls the customer.
- Your shop has a step MTMPRO does not On Premier, add your own status, such as Fitting Booked, give it a colour and drag it to where it belongs.
Where to find them
At the end of each garment's row. Change one garment's status here, or open its history.
Change several garments at once, and see in the Timer column how long each has been in its status.
Under Work Flow. Owners and admins set the order, colours and timers here.
Click a day to see the garments whose timer runs out that day. Owners and admins also see them on the dashboard.
Changing a status
The chip has two halves. The arrow on the left changes the status. The name opens the garment's history, and a small history icon appears on it as you point at it.
- Click the arrow on the chip The status menu opens with the cursor already in Search statuses.
- Pick the new status Click one of the chips at the top, type a few letters, or pick from the full list.
- That is it It saves straight away and Status updated appears at the bottom of the screen.
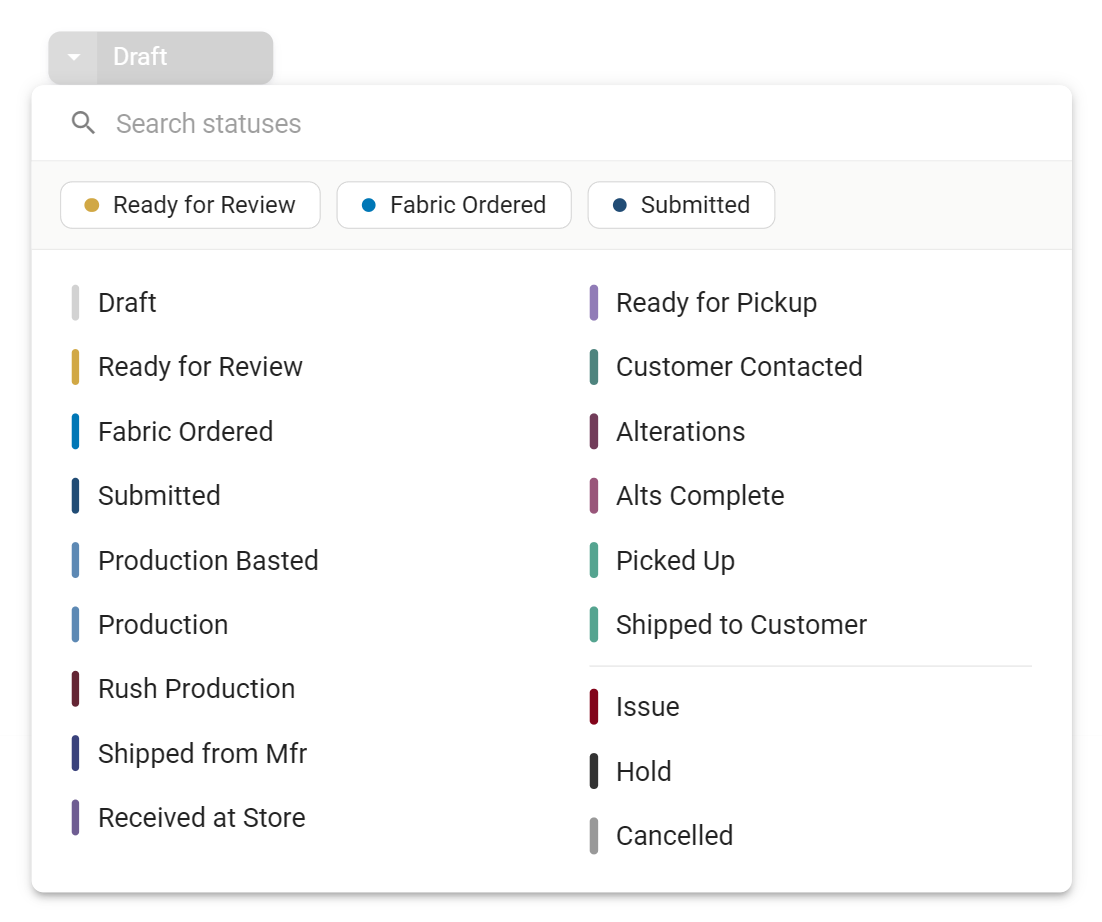
The suggested chips are the three statuses that follow the current one in your list. Issue, Hold and Cancelled are never suggested, because a garment only goes there when something has gone wrong. Switched-off statuses are not in the menu at all.
Two choices behave differently. Submitted, Production and Rush Production ask you to lock an unlocked garment first, see garment locking. Cancelled is applied at once, without a question.
Several garments at once
- Tick the garments On the Garments, opens in MTMPRO page, tick the box at the start of each row.
- Open Update, then Status The Update Status window says how many garments are selected.
- Choose and confirm Pick the status under Select Status, add a note if you like, and click Update Status. The note is kept on each garment's history.
When the manufacturer works in MTMPRO
Some manufacturers use MTMPRO themselves. Once you submit a garment to one of them, they move it through their own steps. The chip loses its arrow and shows a small factory icon instead: click it to read the history. The status is yours to change again once the garment has shipped from the manufacturer. On the Garments page, Status in the Update menu is greyed out while any ticked garment is in this state.
Status history
Click the status name on the chip. A panel opens on the right with the garment, its manufacturer and garment number at the top (and the customer's name when you open it from the Garments page), and every status the garment has been in below, newest first.
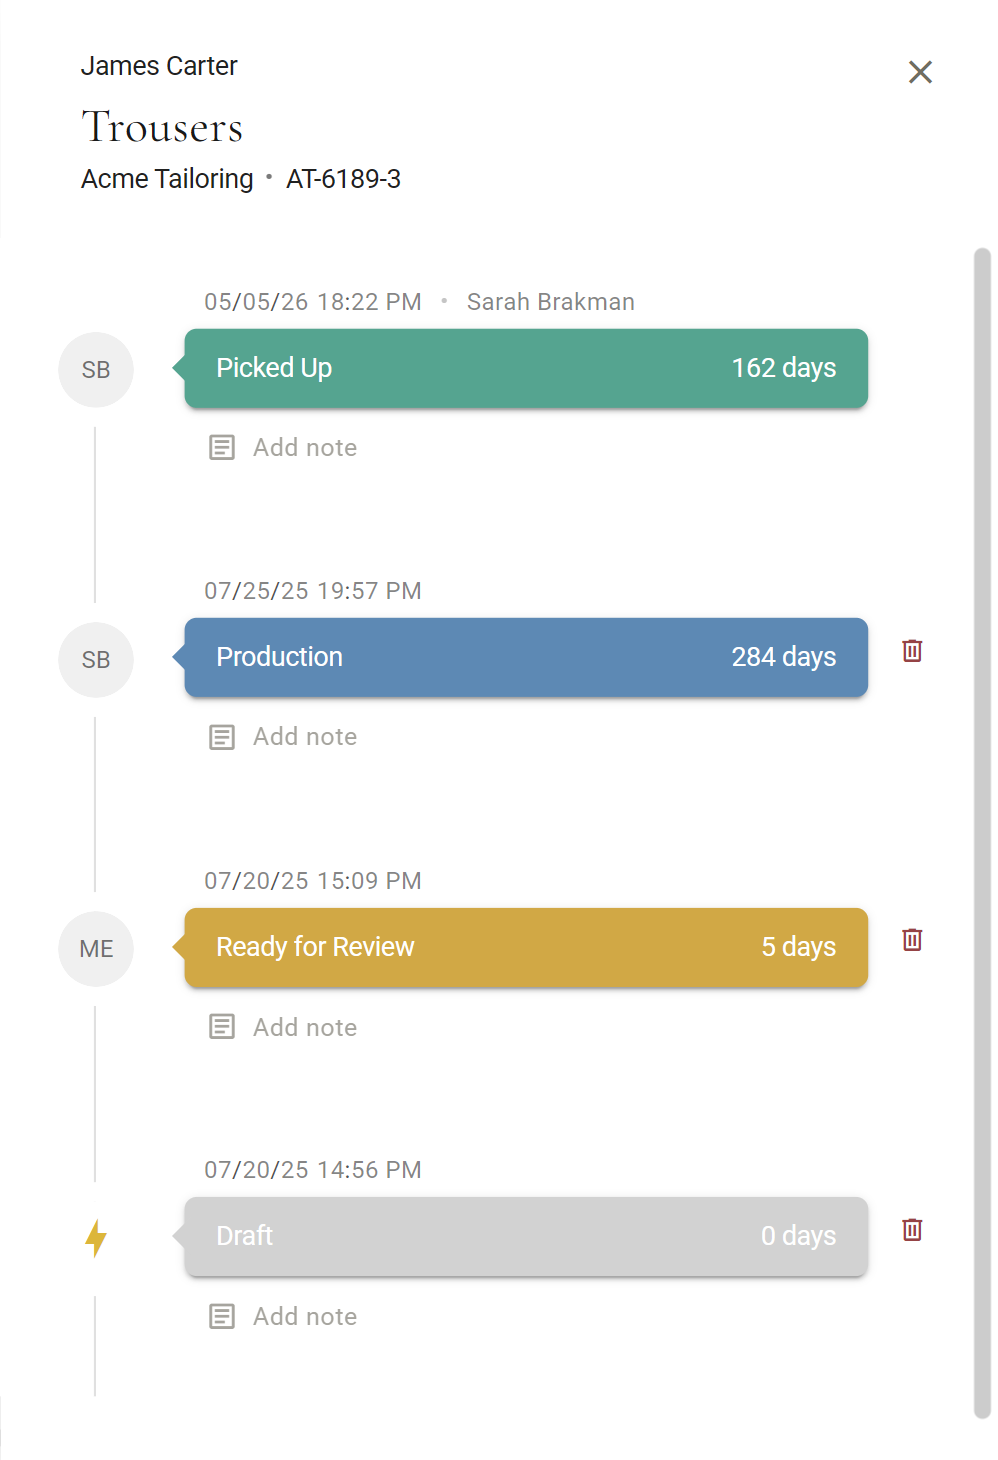
- Who and when. Each entry has the date and time, the photo of the person who made the change and, where it was recorded, their name. A lightning bolt stands in where there is no photo.
- How long. The days on each card are how long the garment stayed in that status. On the newest card they count up to today.
- Notes. Click Add note under a card, type, and click Save. Use it for the reason behind a change: on hold because the cloth is out of stock. Click a note to edit it. Anyone can add notes.
- Removing an entry. Owners and admins see a bin on every entry but the newest, to remove one recorded by mistake. It asks Delete this status? first. The newest entry is the garment's current status and stays.
Setting up your list
Your shop has one list of statuses, shared by everyone. Its order is the order of the status menu, and it decides which statuses are suggested next, so put them in the order a garment really moves through your shop. Open Settings / Garment Statuses, opens in MTMPRO.
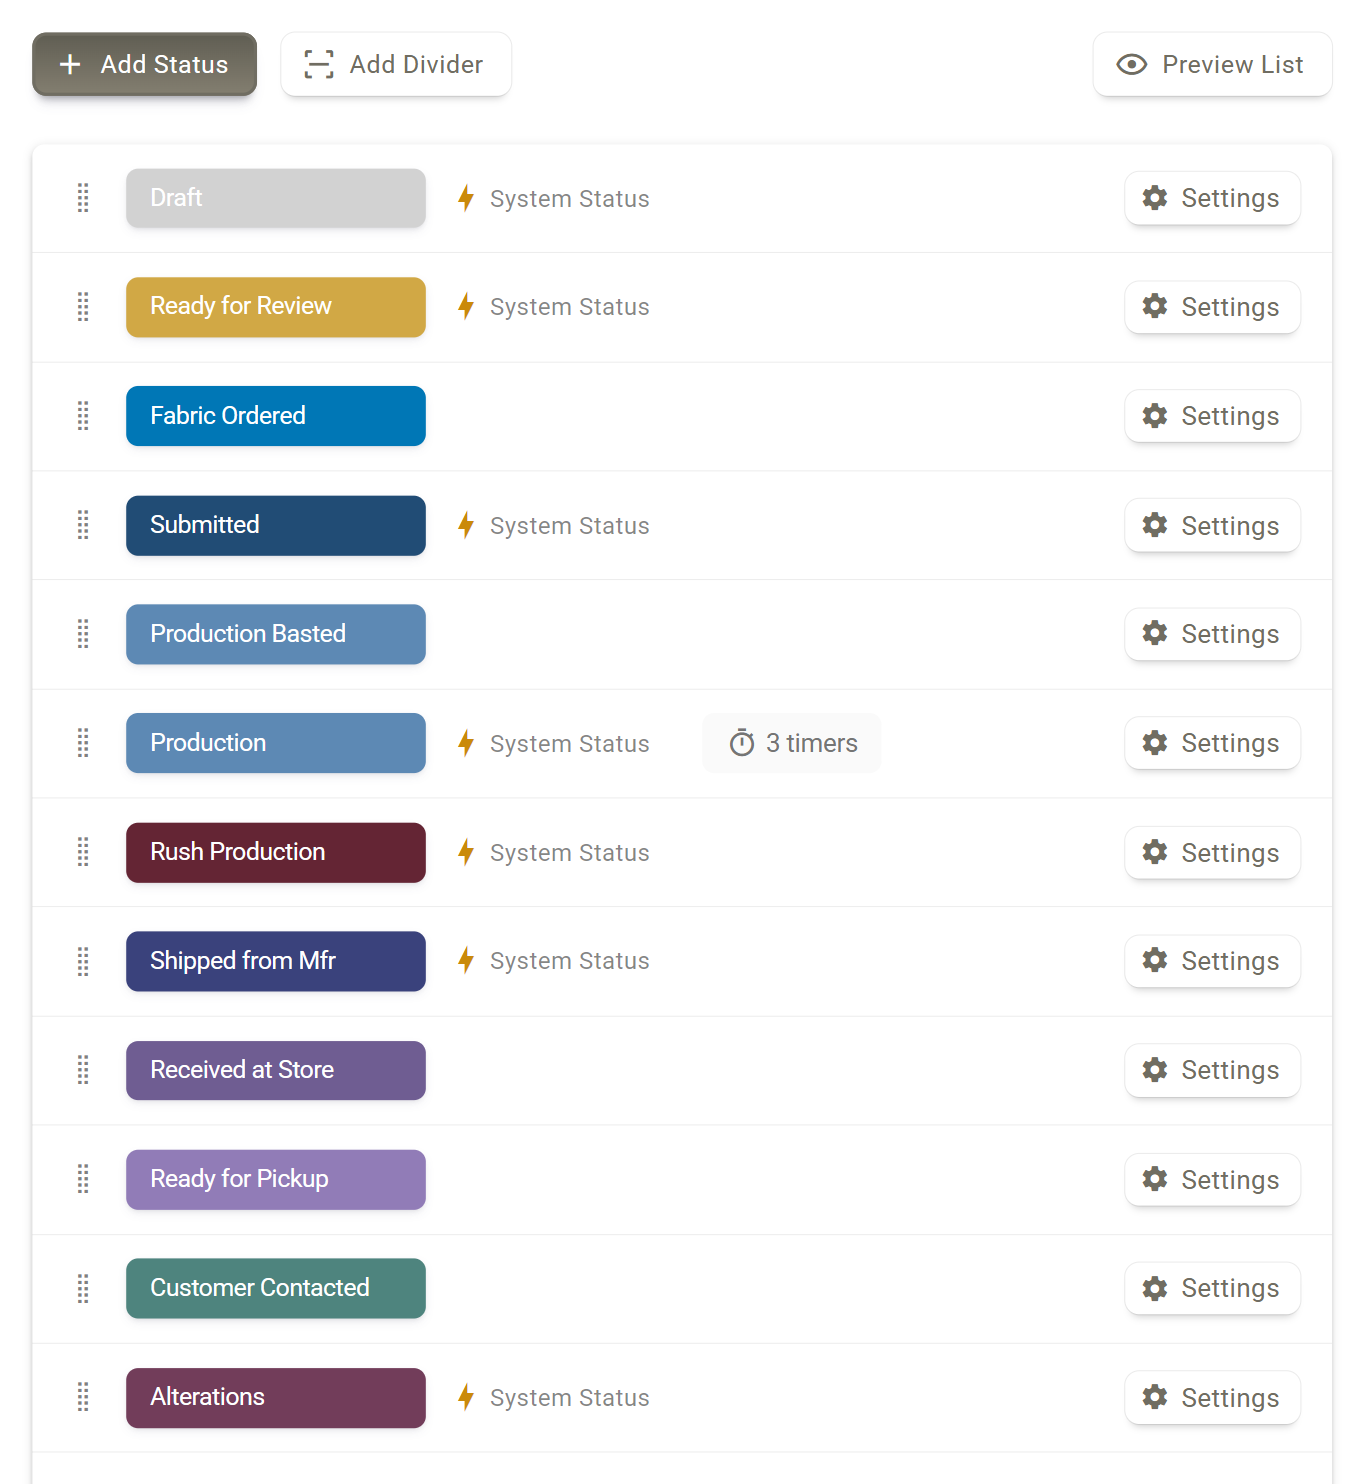
Has behaviour built in, so it cannot be renamed or deleted. You can still set its timers, and on Premier its colour and whether it is switched on.
The status has a timer for every garment, or timers for particular manufacturers and garment types. See status timers.
Switched off. It is no longer offered in the menu, but garments already in it keep it.
A divider. It draws a line in the status menu to group the statuses above it.
Adding your own status
- Click Add Status A panel opens on the right.
- Name it Type the name under Status Name.
- Pick a colour Use the colour picker under Status Color, or type the code in Hex Color.
- Save Click Save. The new status is added at the top of the list. Drag it into place by the handle on the left of its row.
Changing, ordering and removing
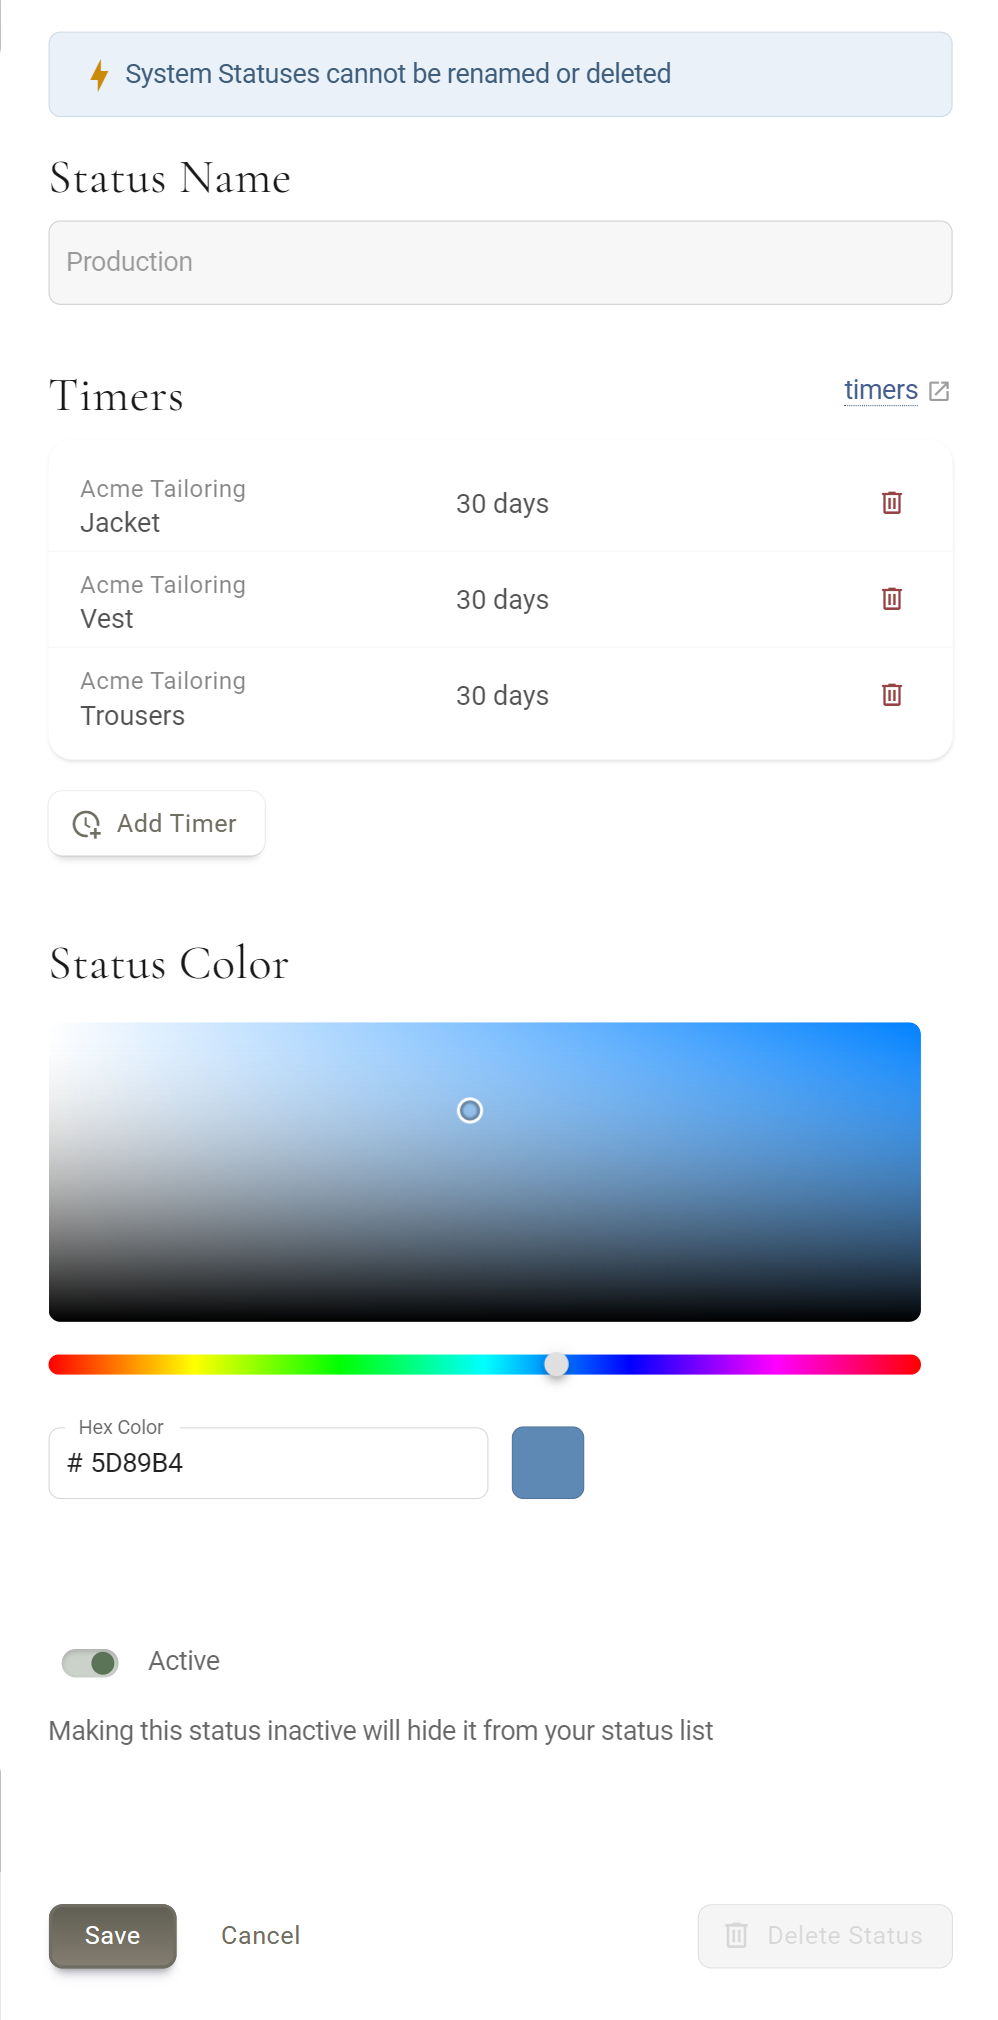
- Change a status. Click Settings on its row, make the change and click Save. Undo change puts a colour back before you save.
- Switch one off. Turn off Active in its panel and save. Useful for a default status your shop never uses.
- Reorder. Drag a row by its handle. The new order is saved when you let go.
- Group them. Add Divider puts a line at the top of the list; drag it under the last status of a group. Its bin removes it.
- Check the result. Preview List shows the menu as your team will see it.
- Delete one you added. Delete Status at the bottom of its panel. It is greyed out while any garment is in that status, and the panel says how many are. Move those garments on first.
Status timers
A timer is how many days a garment should stay in a status before someone looks at it. Put three days on the status for garments waiting to be picked up, and a garment whose count reaches four stands out, so someone calls the customer. Timers are on every plan.
- Open the status In Settings / Garment Statuses, opens in MTMPRO, click Settings on its row.
- Click Add Timer Under Timers. The Add Timer window opens.
- Choose who it coversAll garments, or Specific manufacturers and garments and then the manufacturer and one or more of its garment types.
- Set the days Type them under Timer Duration (Days), at least one, and click Add Timer.
- Save the status The timer is now listed in the panel. Click Save to keep it.
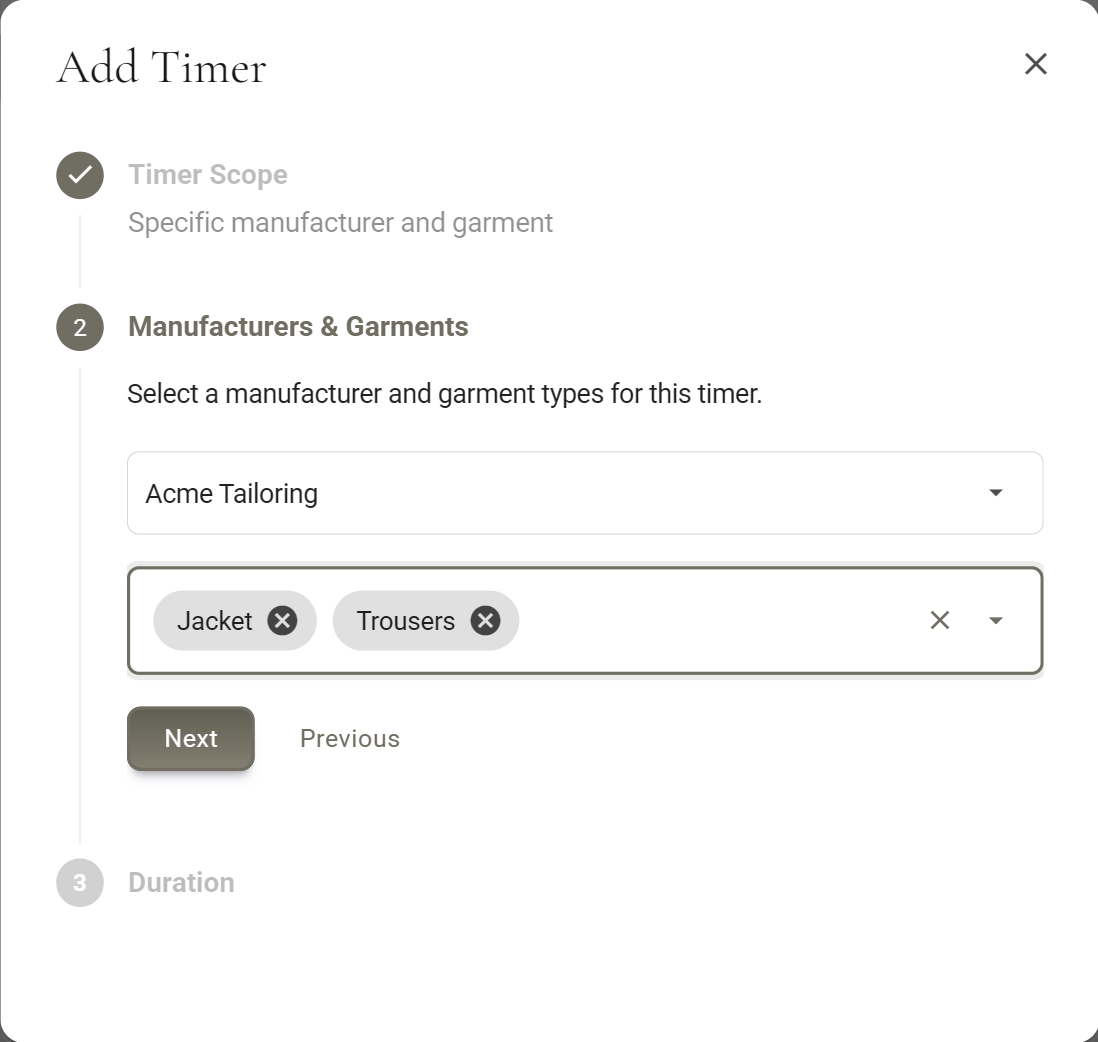
A status has either one timer for all garments or timers for particular manufacturers and garment types, not both: adding one kind replaces the other. Each garment type gets one timer per manufacturer, so types that already have one are greyed out in the window.
Where a timer shows
Set an All garments timer on any status except Production, Rush Production and Alterations, and you see it in these places.
Garments page, Timer column. How many days the garment has been in its status. Shown for every garment except those in Delivered, Shipped to Customer or Cancelled.
Past the timer. The number turns into a red badge and the row is tinted red. Tick Expired Timers in the Filter menu to keep only these on the page you are viewing.
- Calendar. Click a day on the Calendar, opens in MTMPRO to see the garments whose timer runs out that day, under the status name and its days.
- Dashboard. For owners and admins. Due Soon lists timers running out in the next five days. Time in Status vs Target compares how long garments really spend in each timed status with its timer.
- Drafts page. A timer on Draft turns the Age red for orders whose drafts have waited too long.
- Slack. The morning summary lists the timers running out that day. See the morning summary.
Timers on Production, Rush Production and Alterations, and timers for particular manufacturers and garment types, are compared on Time in Status vs Target. A particular timer gets its own line there, with its own target.
On statuses other than Production, Rush Production and Alterations, particular timers do not drive the red badge, the Calendar, Due Soon or Slack yet. Those count every garment in the status against five days, or against the All garments timer the status had before.
Garment locking
Locking a garment keeps a permanent copy of its style and measurements as they stand. It is how you know the manufacturer makes exactly what you sent, even if the customer's measurements or your order form change later.
Once a garment is locked, its style, measurements, fabric and quantity can no longer be changed. The price can, and so can the garment number unless the garment has gone to a manufacturer that works in MTMPRO. Only owners and admins can delete a locked garment. There is no unlock.
When MTMPRO asks you to lock
Moving an unlocked garment to Submitted, Production or Rush Production means it has gone to the manufacturer, so MTMPRO asks you to lock it first.
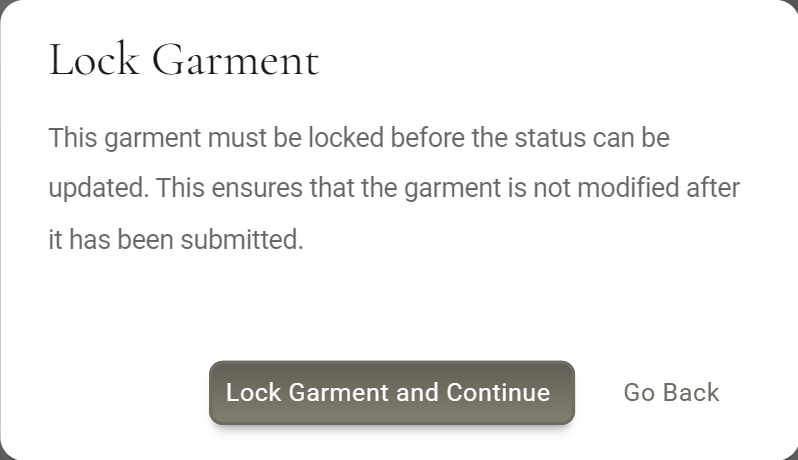
Lock Garment and Continue locks the garment and sets the status. Go Back leaves both as they were. Doing the same for several garments on the Garments page asks Lock selected garments? and locks them all before it changes the status.
Other ways to lock
- Check and Submit on the order locks every garment it sends.
- The three-dot menu on a garment's row, Lock. It asks Lock garment? first, with Lock Garments and Cancel.
- The Garments page. Tick the garments, open Update and choose Lock Garments.
Plans and roles
- Everyone in the shop Can change statuses, read the history, add notes and lock garments.
- Owners and admins Set up the list and its timers in Settings, remove history entries, and delete locked garments.
- Premier and Scale Your own statuses: add, rename, reorder, colour, switch off and delete them, and add dividers. The Free plan's 30-day Premier trial includes this too.
- Business and Free The standard list, with timers. The settings page shows a Custom Garment Statuses banner, and only an owner can click View Features & Pricing to upgrade. See Billing and Your Plan.
- Leaving Premier When the Premier trial ends, or you move to Business or Free, the list goes back to the standard statuses with their standard colours, order and which ones are switched on. Standard statuses you had deleted are added back; one you renamed counts as your own, and the standard one is added back beside it. Garments already in one of your own statuses stay in it, but the status menus offer only the standard ones. Your own statuses are saved, and return as you left them when you upgrade again. See the Premier trial.
Good to know
- New statuses start at the top A status or divider you add appears at the top of the list. Drag it into place straight away, or it is the first thing in everyone's menu.
- Deleting does not ask twiceDelete Status and a divider's bin remove it at once.
- Switching off is safe Garments already in a switched-off status keep it. It is only gone from the menu.
- Cancelled is immediate Picking Cancelled applies straight away and marks the garment as cancelled.
- A note can be lost when locking several If the Garments page has to lock the garments first, the note you typed in Update Status is not kept. Add it afterwards from each garment's history.
- Timers count whole days A garment turns red once it has been in the status for more days than the timer. With a five-day timer, the count in the Timer column turns red when it reaches 6.
More: Getting Started: Workflow · Placing an Order · Garments Screen · Production Calendar · Measurement History · Slack Integration · Voice commands for orders