Measurement Boundaries
Boundaries give a measurement a sensible lowest and highest value, so a mistyped number is flagged the moment it is entered. This page covers setting them for a manufacturer's garment and what your team sees while measuring.
What they do
A measurement is easy to mistype. A chest of 14 when you meant 41, a sleeve written in centimetres on a form that expects inches, a digit lost while the customer is talking. The manufacturer makes what it is sent, so a typo nobody spots becomes a remake.
A boundary gives one measurement a Min and a Max. When someone enters a value below the Min or above the Max, the field is marked Out of Boundary straight away, while the customer is still in the shop and the tape is still in hand. For a manufacturer in inches, the Min and Max themselves count as inside the range. For one in centimetres, a value exactly on the Min or Max can now and then be flagged too.
Boundaries are set for one manufacturer's garment at a time, so a jacket from one maker can have different ranges from a jacket from another.
When to use them
- Someone new is measuring A new associate is still learning your forms. Put ranges on the measurements people most often get wrong, such as chest, waist and sleeve, and a slip shows up before the order leaves.
- Your makers use different units One manufacturer takes inches, another centimetres. A 102 cm chest typed into an inches form is far above a Max of 60, so it is flagged the moment it is typed, before the order goes out.
- A remake would be costly An overcoat in an expensive cloth leaves no room for error. Ranges on its key measurements flag a doubtful value so whoever is measuring can check it before moving on.
Where to find them
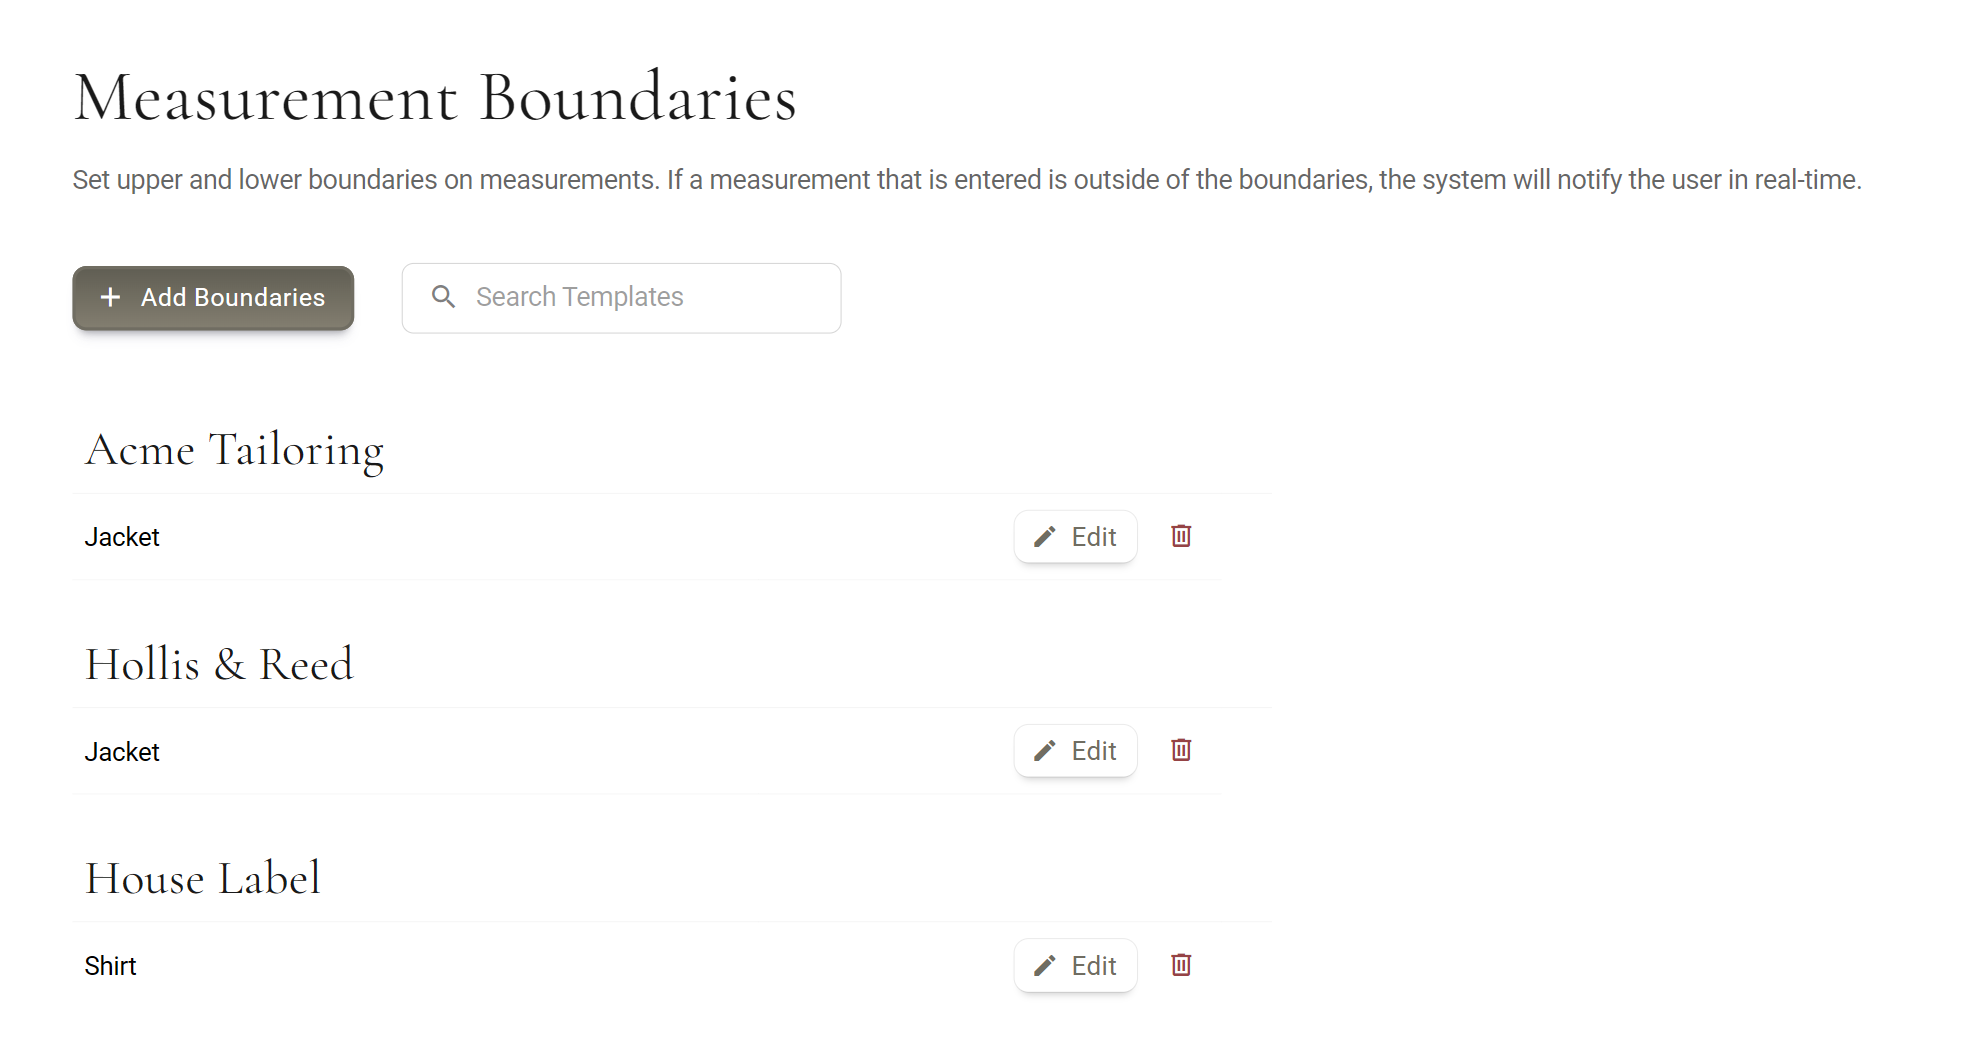
The Measurement Boundaries page. Every garment with boundaries is listed under its manufacturer, with Edit and a red bin on each row.
Where your team sees the warning while they measure.
The same check when you edit a customer's saved measurements.
Adding boundaries
Do this once per garment, after its measurement form is built. You need the measurements on the form before you can give them a range.
- Open the page Go to Settings / Boundaries, opens in MTMPRO and click Add Boundaries.
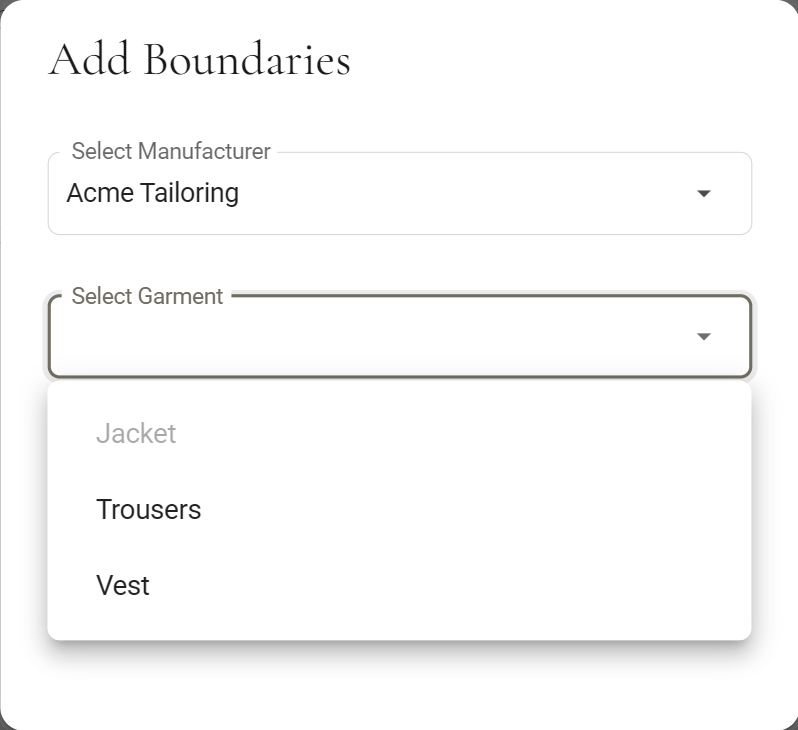
- Pick the manufacturer and garment Choose from Select Manufacturer, then Select Garment. Only garments with a form for that manufacturer are listed, and the ones that already have boundaries are greyed out. Click Continue.
Set the ranges
- Tick the measurements to check The garment's measurement form is listed. Click a row to tick it, and the cursor moves to its Min box. If the form has tabs, a chip for each tab runs across the top; click one to see its measurements.
- Type the Min and Max Give each ticked measurement the lowest and the highest value you would expect, in the unit shown at the top right: Values for Acme Tailoring are in Inches, or Centimeters. Use a decimal point for halves, such as 38.5.
- SaveSave stays greyed out until at least one measurement is ticked and every ticked one has a value. Once saved, Measurement boundaries updated confirms it.
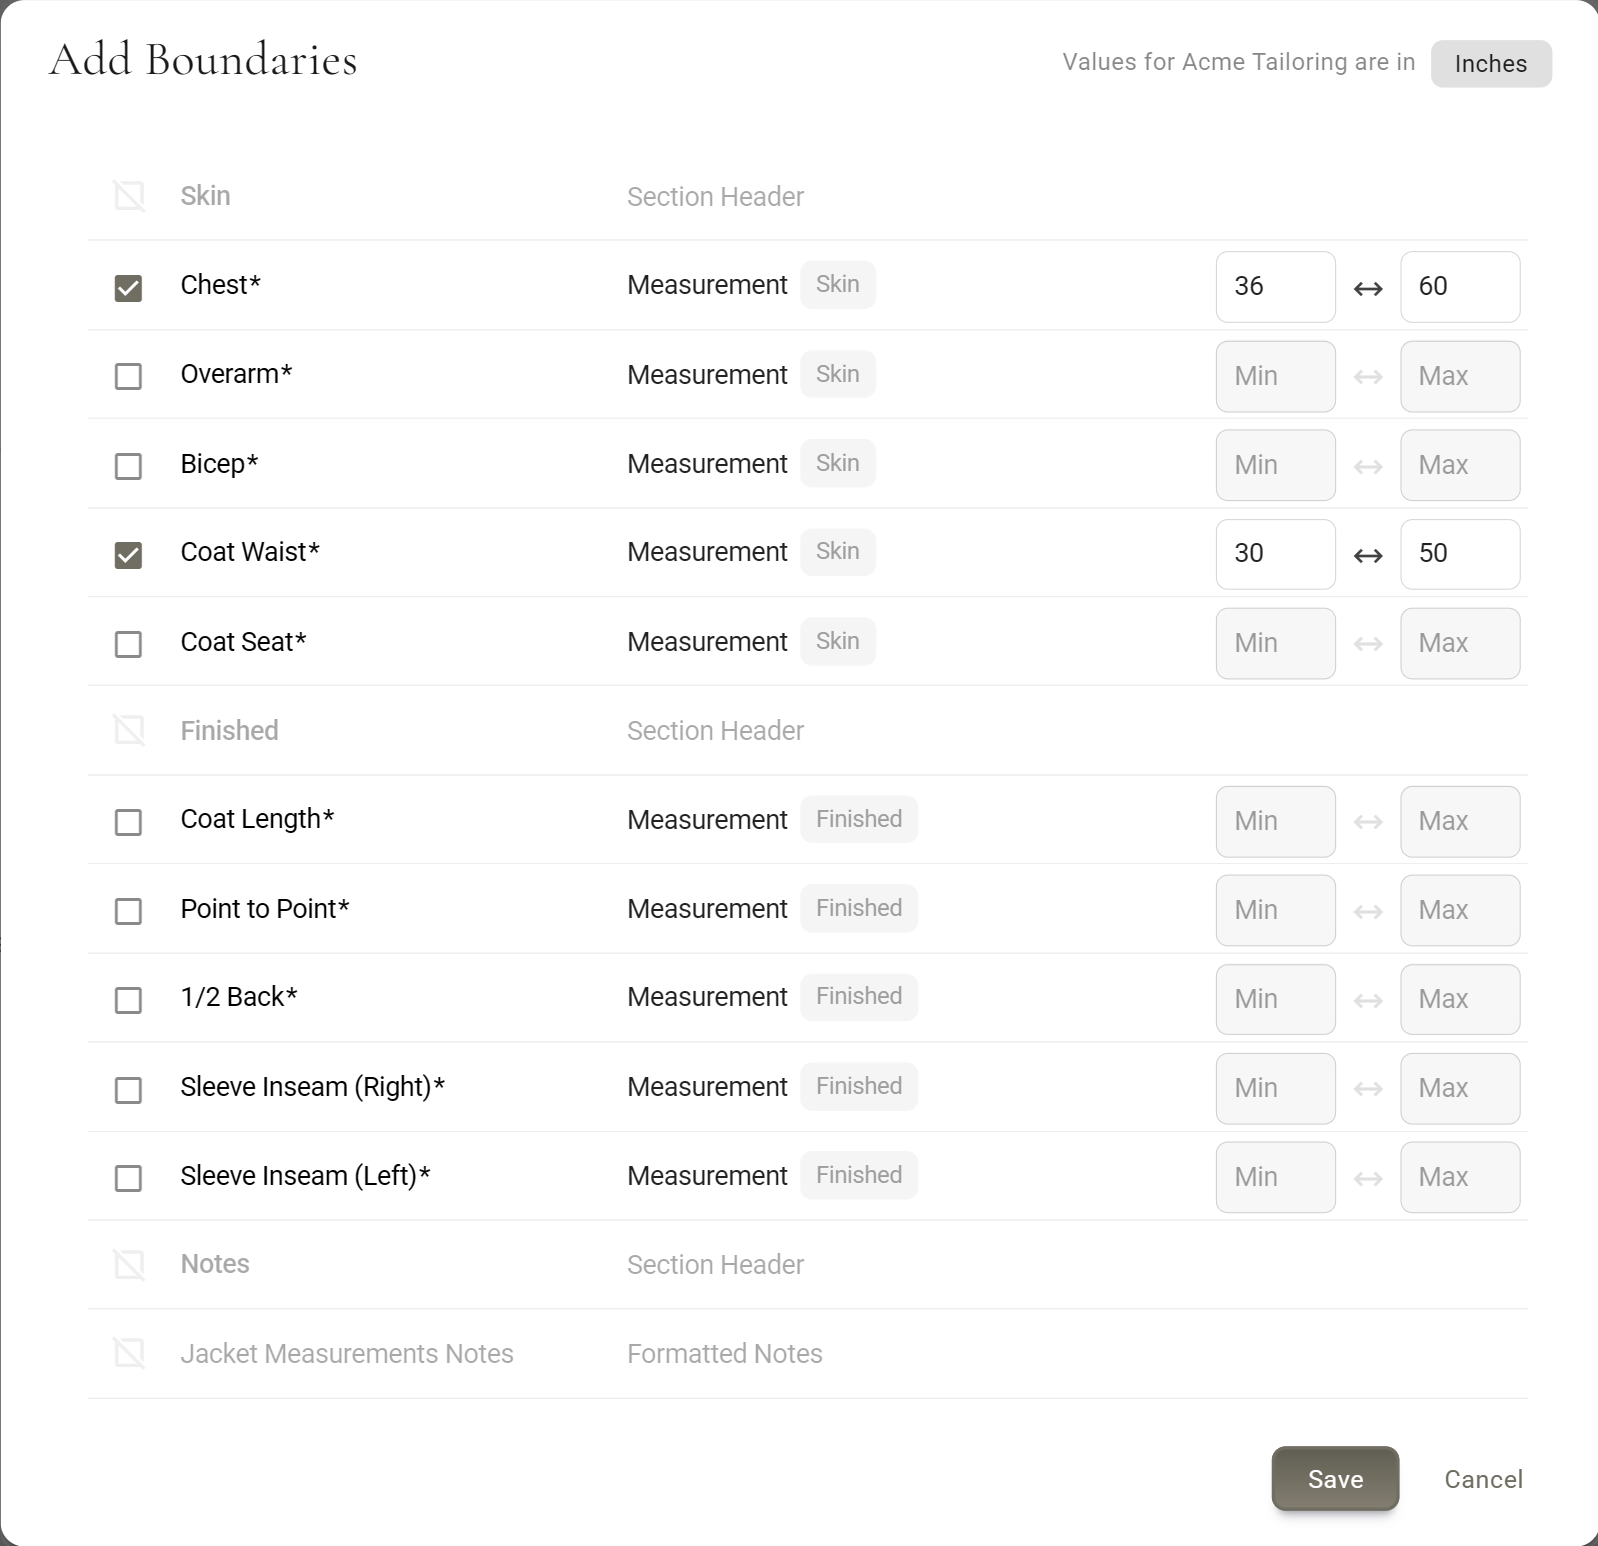
Only Measurement and Measurement + Allowance fields can be ticked. For an allowance field the range is checked against the total, the measurement plus its allowance.
What your team sees
Nothing changes while a value is inside the range. Type one outside it and two marks appear, so the person measuring can check the tape before moving on.
Beside the value you are typing. It goes as soon as the value is back in range. On an allowance field it sits under the row of boxes.
A gold bar down the left edge of the measurement in the list, so a flagged value stands out when you look back over the whole form.
On the first digit the label waits two seconds, so starting to type 38 does not flash a warning at the 3. Keep typing and it never appears.
It is a warning, not a stop. The value saves as typed and the garment can still be submitted. If the customer really does measure outside the range, leave the value as it is, and if that happens often, widen the range.
Values saved before a boundary was set are checked too. Open an older customer's measurements and anything outside the range is flagged.
Change or remove boundaries
- Change a range Click Edit on the garment's row, change the numbers and click Save. It is the same window you set them in, still titled Add Boundaries.
- Stop checking one measurement Open Edit, untick it and save. At least one measurement has to stay ticked, so to stop checking a garment altogether, delete it instead.
- Remove a garment's boundaries Click the red bin on its row. Delete boundary? asks you to confirm, and Delete clears every range on that garment and takes it off the list. It cannot be undone, but you can add the garment again at any time.
- Find a garment The Search Templates box filters the list by garment name. It does not search manufacturer names.
Good to know
- Owners and admins set them Settings is in the menu for owners and admins. Everyone who enters measurements sees the warnings, whatever their role.
- On every plan Measurement Boundaries come with every MTMPRO plan.
- Measurements only Dropdowns, text, checkboxes and Try-on ± Adjustment fields are listed faded and cannot be ticked. Body Profile fields are not listed. The Master Measurements form has no boundaries, because only a manufacturer's garments can be picked.
- The unit follows the manufacturer Ranges use the manufacturer's Enter measurements as setting on its General tab. If you switch it between Imperial and Metric later, the ranges convert with it. Centimetre values show rounded to the nearest half centimetre when you reopen them.
- Numbers and a decimal point The Min and Max boxes take digits and a point, such as 38.5. Fractions such as 38 1/2 cannot be typed there.
More: Using the Form Builder · Field Types · Measurement Tabs · Measurement History