Fit Profiles
A fit profile is another set of measurements for the same customer and garment, so one jacket can be cut slim and the next one regular without losing either set of numbers. This page covers turning fit profiles on, preset names, using them on an order, and how they show on screen and on paper.
What fit profiles are for
MTMPRO keeps one set of measurements per customer for each manufacturer's garment type. Every jacket you order for Daniel Reyes from the same manufacturer uses the same numbers, which is what you want most of the time.
Some customers want different fits of the same garment. A fit profile is another named set of measurements for that garment type, kept beside the default one. Each garment on an order uses one of them, and the manufacturer receives that set with the differences from the default highlighted.
- A slim sportcoat and a regular suit Daniel's suit jackets stay on his default numbers. His sportcoat goes on a Slim Sportcoat profile with a trimmer chest and waist.
- Summer trousers cut looser A Relaxed Trouser profile for linen, without touching the numbers that work for his wool trousers.
- A travel jacket that worked After a fitting, the customer loves a slightly shorter, roomier jacket for travel. Give it its own profile, and next year's travel jacket starts from those numbers while his business jackets stay as they are.
Where to find them
Under Measurements in the Settings menu. Owners and admins switch fit profiles on or off per manufacturer and set up the names your team picks from.
In the measurements window, next to the garment type. It reads Default Profile, or the customer's renamed default, until another profile is applied. This is where you add a fit profile and switch between them.
One row for each manufacturer, garment type and fit profile. Edit opens that profile's measurements and Rename renames it.
Turning fit profiles on
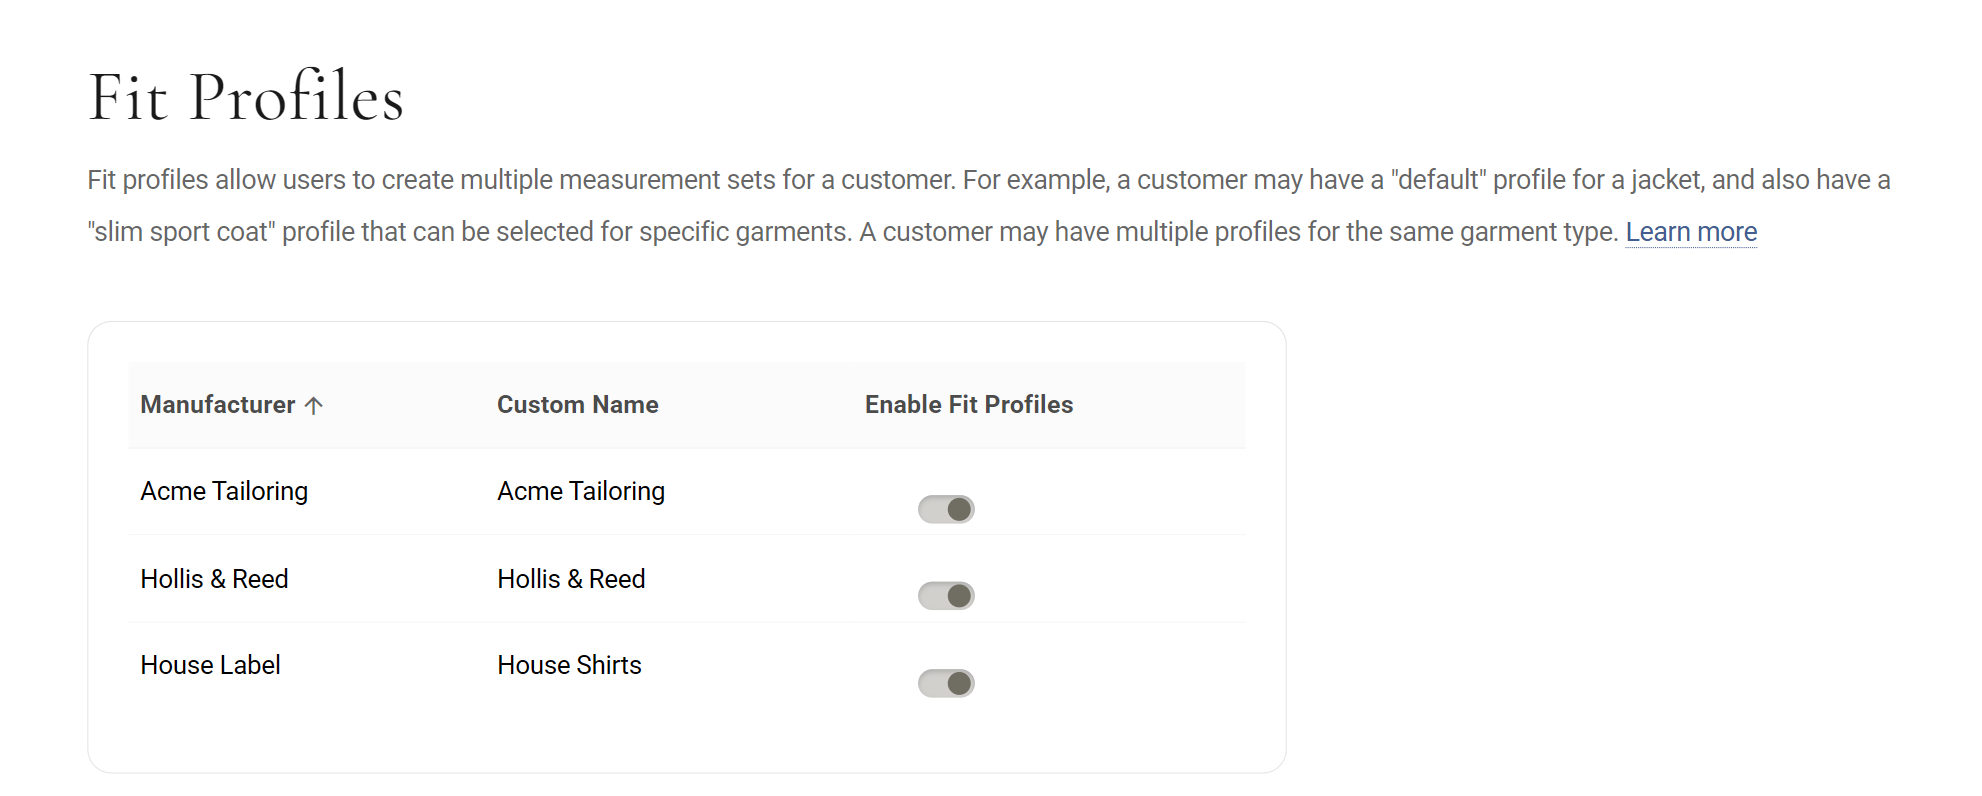
Fit profiles are switched on per manufacturer, and every manufacturer starts switched on. Use this page to switch off the manufacturers where your shop never needs a second fit, so the button does not appear on their measurements at all.
- Open Fit Profiles In Settings, opens in MTMPRO, under Measurements, click Fit Profiles.
- Find the manufacturer The table lists your active manufacturers, with the Custom Name your team sees on orders.
- Use the switch Turn Enable Fit Profiles on or off. It saves straight away, and a message confirms it, such as Use fit profile is enabled.
Preset names
Left to themselves, three people will name the same fit three ways: Slim, slim fit, Slim Jacket. Presets give your team a short list to pick from when they add a fit profile, so the names match from one customer to the next.
A preset belongs to one manufacturer and one garment type. A jacket preset is only offered on that manufacturer's jackets.
- Click Add Profile Name Under Preset Profile Names, on the same page.
- Pick the manufacturer and garmentSelect Manufacturer, then Select Garment, which lists that manufacturer's garment types.
- Name it and save Type the Profile Name and click Save. A message reads Profile added.
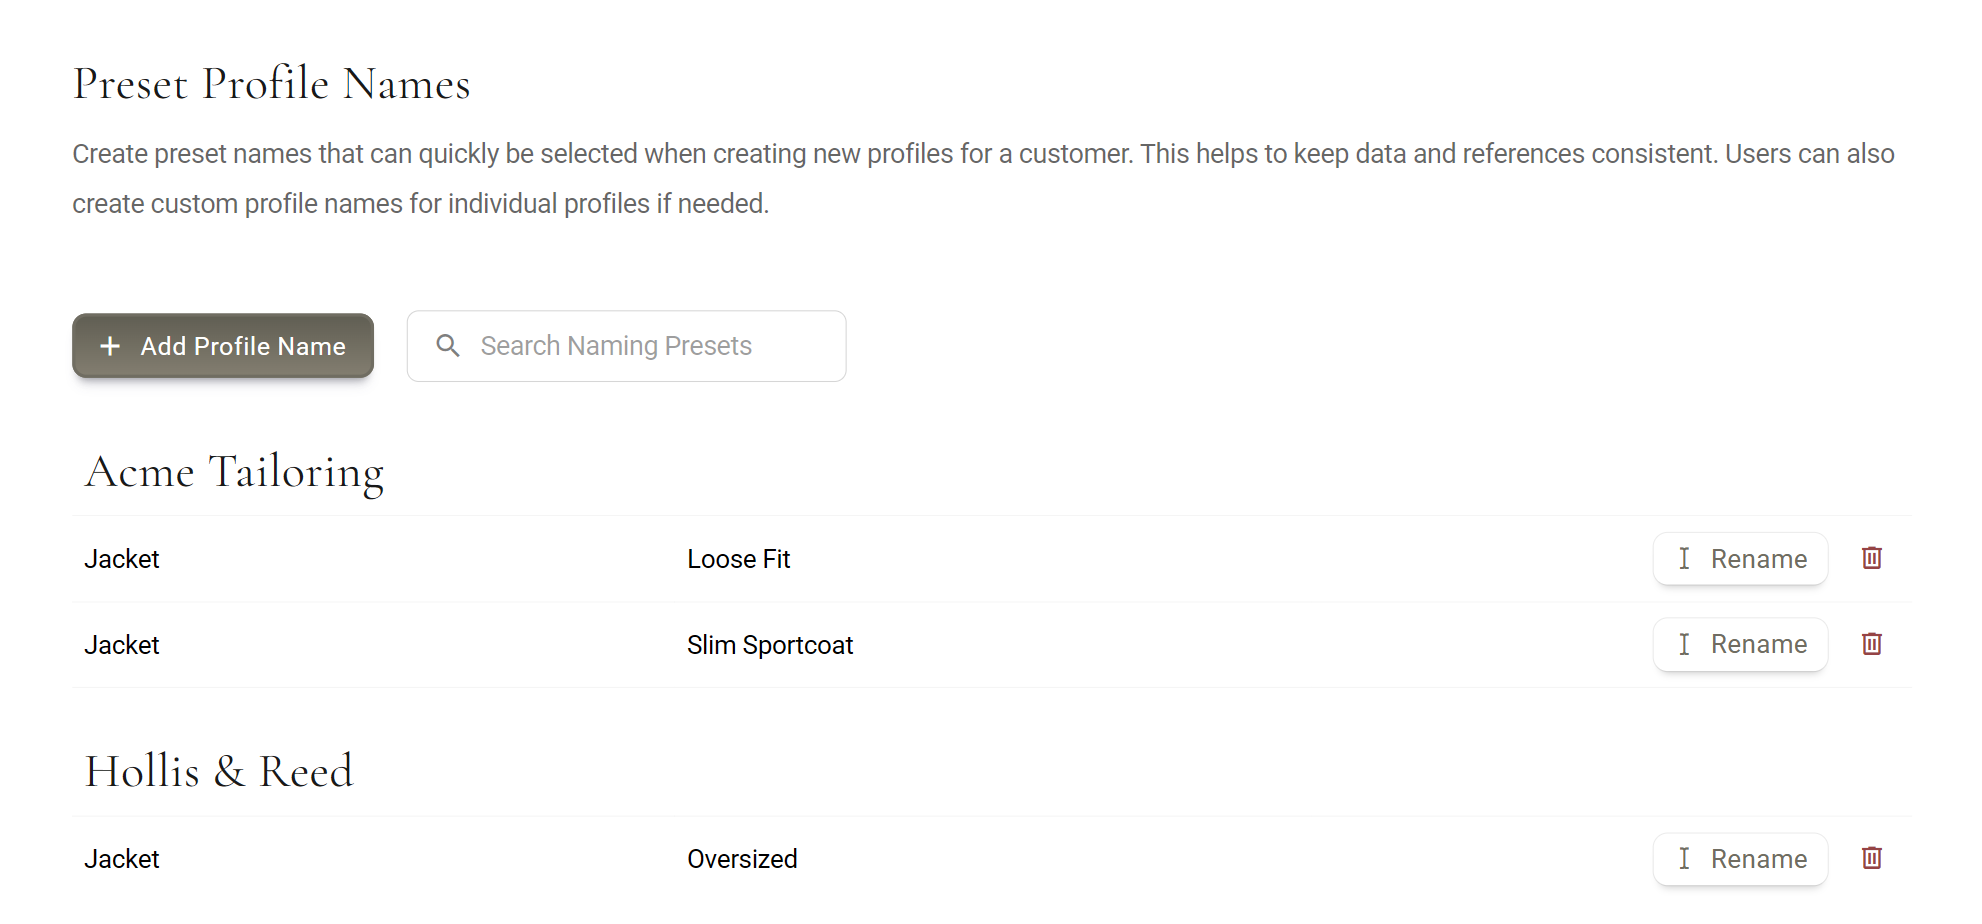
- Renaming and deletingRename changes the preset. The bin asks Delete profile? first. Neither touches profiles customers already have: those keep the name they were given.
- Finding oneSearch Naming Presets filters the list as you type.
- From an order Once a garment type has presets, the box your team names a new profile in has a Customize this list link that opens them here in a new tab.
Adding a fit profile to a garment
You add a fit profile from a garment on an order, because that is when you know it needs a different fit. Daniel's sportcoat is on his order with his default jacket numbers. You give it its own profile and change only what differs.
- Open the garment's measurements Click Measure on the garment's row in the order.
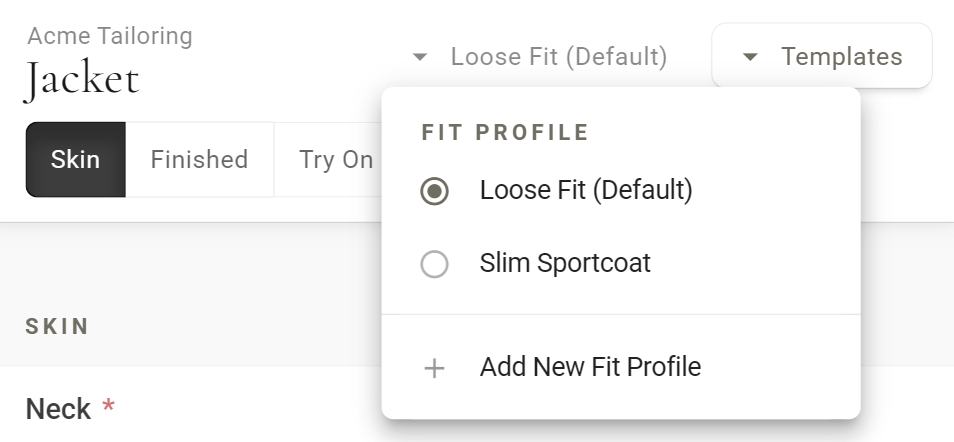
- Open the fit profile menu Beside the garment's name is a button reading Default Profile, or the customer's renamed default. Click it.
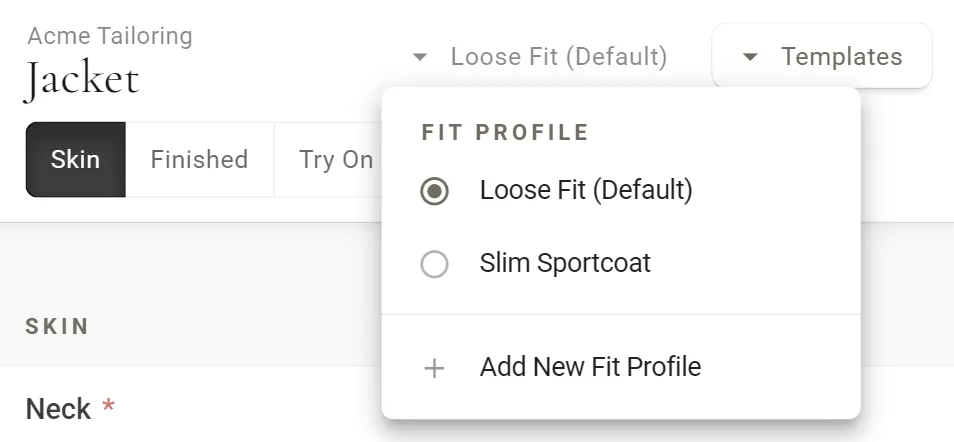
This customer's default is renamed Loose Fit. The filled circle is the profile this garment uses. Add New Fit Profile is at the bottom. - Click Add New Fit Profile It stays greyed out, with the line All required fields must be complete before adding a new fit profile, until every required measurement for this garment is filled in.
- Name it Pick a name from the list, then click Save and Continue.
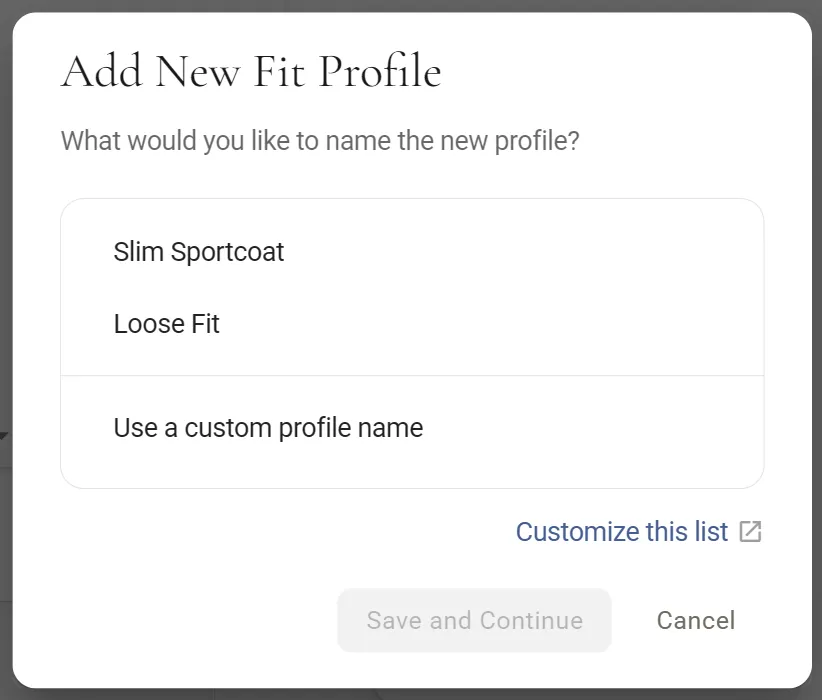
The presets for this manufacturer's jacket. Save and Continue stays greyed out until you pick a name. - Change what differs A message reads New profile added, the garment is now on the new profile, and the button shows its name in blue. The profile starts as a copy of the default, so change only the measurements that are different for this fit.
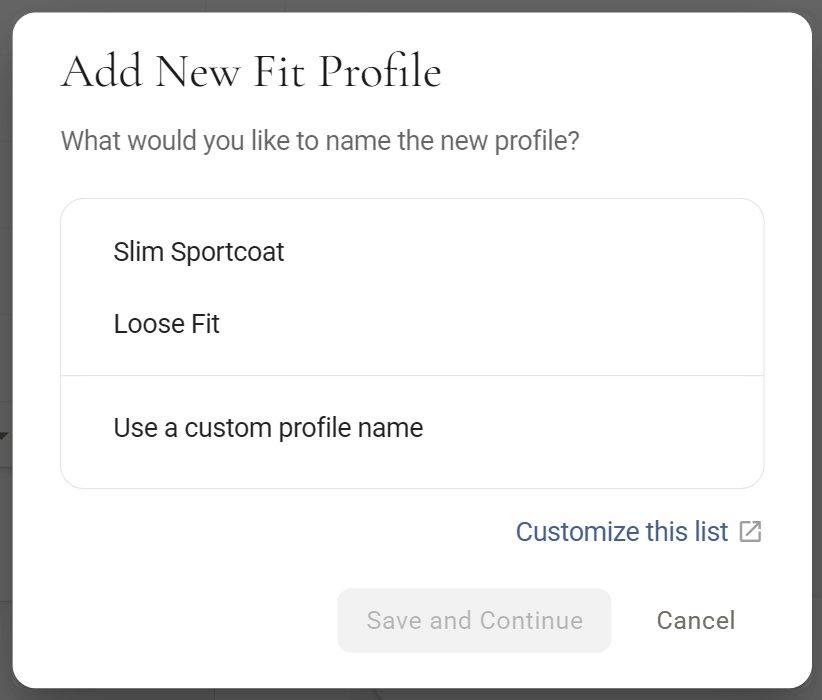
If there are no presets for this garment type, the box asks for a Custom Profile Name instead, with a note suggesting presets.
Switching and renaming
Daniel's next sportcoat goes straight onto his Slim Sportcoat profile. Open its Measure, click the button beside the garment's name and pick the profile. A message confirms it, for example The 'Slim Sportcoat' profile is now applied, and the window shows that profile's numbers. Pick the default again to go back.
To rename a profile, point at it in the menu and click the rename icon at the end of its row, or use Rename on the customer's Measurements tab. Renaming the default changes how it reads, for example Loose Fit (Default). Renaming a fit profile changes it on every garment that uses it.
On the customer's Measurements tab
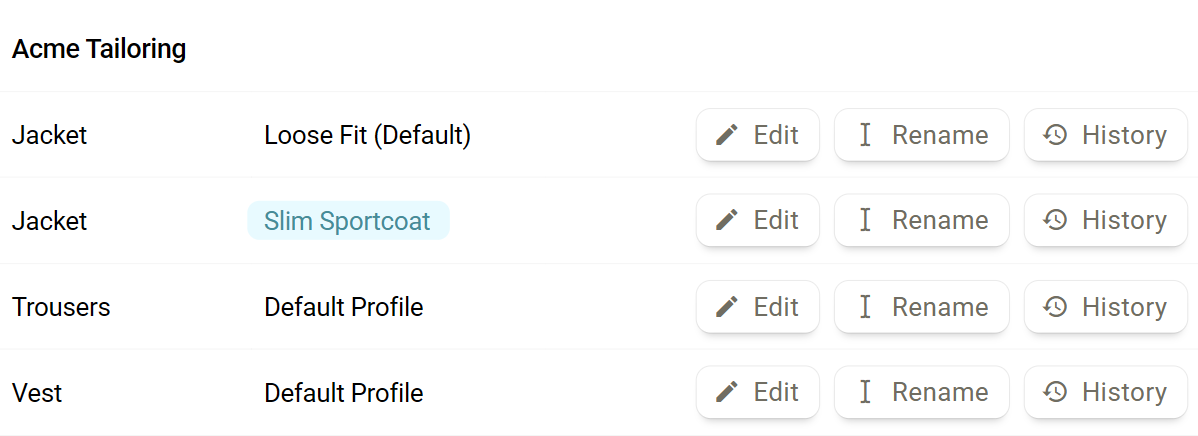
Edit opens that profile's measurements, so you can update a fit without an order. The button beside the garment's name shows which profile you are in, but adding and switching profiles only happens from a garment on an order.
What each part means
The button beside the garment's name has three looks.
Plain. The garment uses the customer's default measurements. A renamed default keeps (Default) after its name.
Blue, with the profile's name. A fit profile is applied to this garment, and these are the numbers the manufacturer will get.
A changed measurement. In the measurements window, a value that differs from the default shows the default's value above it in grey, struck through. Plain numbers and text also get the blue box. Choices from a list and skin plus allowance fields get the struck-through value only.
On Preview and the PDF
The manufacturer should never have to guess why this jacket's chest is not the one on file. When a garment uses a fit profile, its Preview and the PDF carry a notice, and every measurement that differs from the default is tinted.
Chest and Waist differ from Daniel's default jacket, so they are tinted. Sleeve Length is the same as his default.
In the spreadsheet attachment, the name of each measurement that differs starts with a warning sign.
Who can do what
- Owners and admins Everything here, including the switches and preset names in Settings.
- Associates Add and switch fit profiles on orders, and rename them there or on the customer's Measurements tab. With no presets set up, the naming box tells them Ask your administrator to create naming presets to select from.
- Plans Fit profiles come with every MTMPRO plan, Free included. If the whole Fit Profiles page is greyed out with every switch off, they are turned off for your account. Contact MTMPRO.
Good to know
- One customer, one garment type A profile belongs to one customer and one manufacturer's garment type. Daniel's Slim Sportcoat is offered on that manufacturer's jackets for Daniel, not on his trousers or another manufacturer's jackets.
- Garments on the same profile share their numbers Change the chest on one Slim Sportcoat garment and every unlocked jacket on that profile shows the new chest too. A locked garment keeps the numbers it was locked with.
- A copy, not a link A new profile copies the default once. Later changes to the default do not flow into it. They show up as differences instead.
- Body profile answers are shared Posture and the rest of the body profile are the same on every fit profile, and are never highlighted as different.
- Measure Garments opens the defaults The Measure Garments button at the top of an order opens the garment types you keep selected in its list, each on its default profile. To work on a garment's fit profile, use that garment's own Measure.
- Suits have one button per part On a garment made of several parts, such as a two-piece suit, the jacket and the trousers each have their own button, so each part can be on its own profile.
- Names must differ MTMPRO will not add a fit profile with the same name as another of the customer's fit profiles for that manufacturer's garment type. Pick another name if it refuses one.
- No delete A customer's fit profile can be renamed but not deleted.
- Try-on sizes and history follow the profile A try-on size picked for a garment is saved for its fit profile, and measurement history keeps each profile's changes in its own list.
- Switching a manufacturer off Turning off Enable Fit Profiles hides the button, the fit profile names on the customer's Measurements tab and Rename for that manufacturer, and the profiles are kept. A garment already on a fit profile stays on it with no button to switch back, so move garments back to the default first.
More: Measurement History · Measurement Tabs · Getting Started